Have you just bought a CSL DD, a GT DD pro or a Fanatec DD1 or DD2? It’s high time to go and configure it using the software supplied by Fanatec. The Fanalab will enable you to quickly find your ideal force feedback. But I’ve noticed that for new users, it’s a scary piece of software. Some are quick to say that it’s a gas factory.
Yet, as you’ll see in this article, it’s actually very easy to use. The real problem lies in the technical terms of force feedback (identical for all brands), which are often difficult for new players to interpret. And frankly, that’s understandable. Brands don’t really make an effort to explain them properly… Or at least clearly.
So today, my mission is to make Fanalab as simple as possible for you. And above all, to explain to you as concretely as possible what lies behind the technical terms of FFB (force feedback) adjustment. Are you ready? Let’s get started!
Download Fanalab
Before getting started, you’ll need to install the software. If you haven’t already done so, here’s the Fanatec link to do so. Once downloaded, you can unzip the ZIP file and launch the application to install itself. All in all, it will take 2 minutes.
First step: connecting Fanalab to a simulation
The first time you open Fanalab, your first task will be to connect it to a game. You’ll go to the menu on the right-hand side of the screen, which is called “Game Profile”. On the left you’ll find a list of games. Click on the game you want to start with. Then click on the two green buttons “Enable telemetry” and “Enable Fanalab’s game LED/Hardware support”.
Don’t worry, you won’t have to come back to this page very often. In general, you’ll only come back to it if the simulation has undergone an update.
Next, we’ll go to the ” Main” page, where you’ll find your connected peripherals. If you’ve switched on your base and plugged in your branded peripherals, they should all appear here. We won’t spend much more time on this page. What we’re really interested in is typing in the FFB settings 😉
Getting off to a good start
To get your settings off to a good start, you can visit the Fanatec Forum(here’s the link!). There you’ll find recommendations for setting up the Fanalab and your game. These suggestions can be used as a basis for gradually finding exactly what you want to feel.
The idea is to use these settings as a starting point, to drive a little to understand the information transmitted by the steering wheel. Then test each adjustment line one by one to get a full feel for what each one does.
How are we going to proceed together?
We’re going to take a step-by-step look at the various fine-tuning options on this page. You’ll see that some settings will probably never be useful to you. You’ll set them once and never have to come back to them again. But you’ll probably want to change others with experience. The aim is always to better understand what’s going on between your vehicle and the road.
Fanalab Tuning Menu settings
OK. I invite you to go to the Tuning Menu page now. This is where everything will come into play for your force feedback. A word of warning: depending on the base and pedalboard you have, you may find you have fewer options. So don’t panic, it’s perfectly normal – just do your shopping!
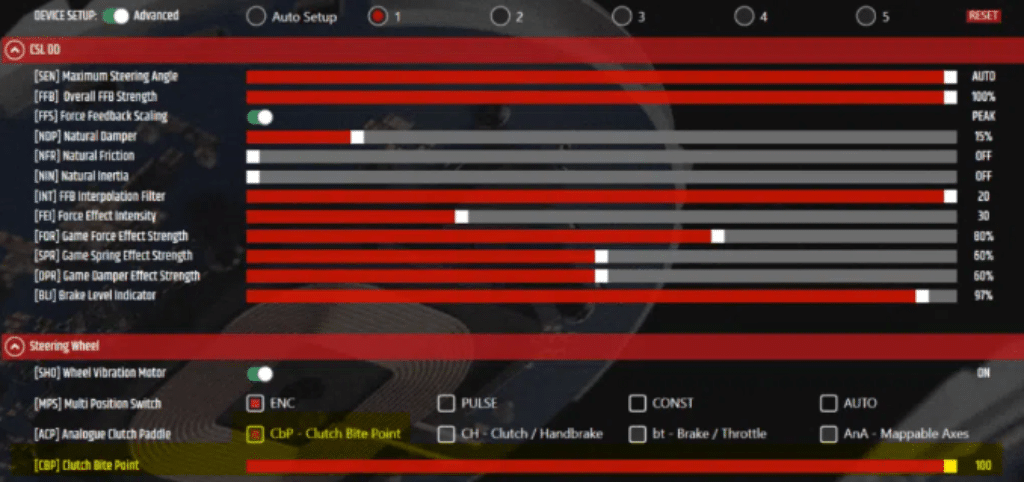
Device Set Up
- What’s Device Set Up? Choice of setting memory
- Options: 1 – 2 – 3 – 4 – 5
One of the major advantages of Fanalab is the ability to create 5 completely different settings . Save them. Then switch from one to the other without having to pause your race, in 2 actions directly on your steering wheel.
They’re the only ones to have so well integrated the modification of race settings. And in my opinion, that’s what makes this software more attractive than all the others. So, in concrete terms, you’re going to choose which settings you want to save.
SEN Maximum Steering Angle
- What’s SEN? Maximum steering angle
- Options: 90 to 2520° (or Automatic)
Here you define the maximum steering angle your steering wheel can make. In other words, the number of turns. If you want to lock your steering wheel at 360°, 540°, 700°, 980°, 1080° etc., this is possible. It’s possible.
Setit to Auto and the game will take care of setting the right steering angle. A setting you’ll probably never use 😉
FF Overall FFB Setting
- What’s FFB Setting? Force feedback power
- Options: OFF to 100%
This is the maximum power delivered by the base. For example, if you have a Fanatec CSL DD base, setting this to 100% will give you 8Nm of peak. Set it to 50 and you’ll have only 4Nm of torque. It’s as simple as that.
Set it to 100 and you’ll never touch it again… To lower the torque, you’ll have to use the game to avoid losing the base’s detail capacity.
FFS Force Feedback Scaling
- What’s FFS? Calibration
- Options : Peak or Linear
Here we come to a setting that’s a real pain to explain. If you leave the setting on Peak , the force feedback will never hesitate to send the maximum power from the base when needed. Nor will it smooth out the differences in force that will be transmitted if you go from asphalt to a vibrator. Or if you hit a wall.
By setting it to Linear, the force feedback will tend to “smooth out” the effects and avoid sending “discharges” of brute force. Depending on the base you have, I recommend different approaches.
On a CSL Elite or Clubsport V2.5 base (i.e. belt-driven), I’d rather set the setting to Pic. Why would I do this? Because the belt mechanism already has a natural tendency to smooth out the effects. And these bases are for power ratings of between 6 and 8Nm maximum. Peak forces are manageable.
The same applies to CSL DD or GT DD Pro 5 to 8Nm. Here we’re on Direct Drive, but power is limited, so I tend to stay on Peak.
On the other hand, if you’re on DD1 or DD2, the Fanalab’s Linear setting comes into its own. You have enough power in the base to have as much force as you want. And you can take advantage of the more natural smoothing provided by the linear setting. Well, as always, test and make up your own mind.
NDP Natural Damper
- What’s NDP? Damping effect
- Options: OFF to 100%
Damper is a damping effect added to the force feedback from the wheel. The default setting is 50%. In practice, if you switch it off, you’ll notice that all effects are amplified. Vibrations, grip changes, everything seems a little more jagged.
Turn it up to around 50% and you’ll notice that the force seems “smoothed out”. In other words, there are fewer gaps between the effects sent through your hands. This effect also helps avoid what’s known as oscillation.
Wobble is when you let go of the steering wheel in a straight line and it starts to go off in all directions by itself. The damper reduces or even stops this. But be careful not to use too much damper. You’ll lose a lot of fine detail.
NFR Natural Friction
- What’s NFR? Steering shaft friction
- Options: OFF to 100%
Moving on to wheel friction. This is an effect that will also be added to what the game sends you. This time, the aim is to add friction to wheel rotation. Turning the wheel will therefore require more energy. Quite simply!
NIN Natural Inertia
- What’s NIN? Steering wheel inertia
- Options: OFF to 100%
This effect adds inertia to the steering wheel movements. Useful if you want to feel the weight of the vehicle shifting to one side or the other. It can also be useful in drifting to impart a movement in one direction and then the other to the wheel with greater ease.
INT FFB Interpolation Filter
- What’s an Interpolation Filter? Fills holes in the communication between the set and the wheel
- Options: OFF to 20
A very complicated term to explain a very simple thing. In a nutshell, your game sends information to your steering wheel, which then translates it for your hands to understand. But the problem is that communication isn’t 100% fluid. The game sends information at a given interval, and between the information, there’s nothing.
To put it another way, it’s like having a phone conversation with someone who has a bad signal. The words are choppy and you have to concentrate to understand the meaning of the sentence.
Interpolation is exactly the same. The game sends “chopped” data, and the software fills in the gaps to make everything as fluid and comprehensible as possible. Try different interpolation settings depending on the simus you’re using.
You’ll find that on some simulators like iRacing or AC, the difference is easy to notice, whereas on others like ACC, it’s much more subtle. It’s simply a question of the amount of information sent every second by the game. The higher this number, the less interpolation is required.
FEI Force Effect Intensity (Filters game effects)
- What’s FEI? Force Effect Intensity
- Options: OFF to 100%
Effects such as vibrators, road effects etc. can be turned up or down. You can turn game effects up or down here. It doesn’t affect the overall strength, just the effects sent by the game.
For example, if you find that the vibrators are far too violent for the cornering forces you have in the game, you can play around with that. But you can adjust this directly in-game, of course.
FOR Game Force Effect Strenght (Filters game effects)
- What’s this? Game effect strength
- Options: OFF to 120
Like the previous one, except that this time it acts on the turning force sent by the game.
SPR Game Spring Effect Strenght (Filters game effects)
- What’s this? The wheel returns to the center on its own
- Options: OFF to 120
When you’re in the game menus, there’s usually an effect that always centers the steering wheel. Well, this is where you can lighten or harden the effect.
DPR Game Damper Effect Strenght (Filters game effects)
- What’s this? Game damper effect
- Options: OFF to 120
We’ve already talked about damping effects, but here we can increase or reduce the damping filters created by the game.
BLI Brake Level Indicator
- What’s BLI? Brake pedal vibration
- Options: OFF to 100
If you have a Clubsport V3 pedalset, you may have noticed that it has vibration motors. These motors are located behind the gas pedal and brake pedals.
This setting, which translates as Brake Level Indicator, allows you to trigger vibrations on the brake pedal. You’ll be able to choose when these vibrations start. Personally, I set it to 100%, so the pedal vibrates when I apply 100% braking force. But you can set it to 95 or 98%, for example, to warn you that you’ll soon reach maximum braking force.
SHO Vibration Strenght
- What’s this? Brake pedal vibration strength
- Options: OFF to 100
Like the previous setting, this one is available for Clubsport V3 pedalset owners. You’ve already set the point at which the vibrations start. Well, now you can simply adjust their power .
MPS Multi-position Switch
- What’s MPS? How to use the clutch paddles
- Options : A – B – C – D
Only on wheels with clutch paddles, such as the McLaren GT3 or those equipped with the Podium paddle module. You can define the purpose of these paddles. You can use them in Bite Point mode, so that each paddle has, for example, 50% clutch each, for a beautiful stop-start.
But you can also choose to have one clutch paddle and one handbrake paddle. A throttle paddle and a brake paddle. Or you could even make them adjustable axes.
BRF Brake Force Level
- What’s BRF? Force required to brake
- Options: 0 to 100%
This is another setting you won’t use very often, but it’s of the utmost importance. It sets the force you need to apply to your brake pedal’s pressure sensor to brake at 100%. The factory setting is 50%. Start from there and increase it by 5% until you find your ideal braking force. But don’t set it too high either, as you’ll end up hating yourself on long sessions 😉
Dynamic FFB
Dynamic effects are divided into 2 groups. They can’t be modified from the steering wheel, so you’ll have to go directly to Fanalab for those. Fortunately, they won’t be used on a daily basis.
Damper Overlay
Here’s a damping effect that can be triggered from a certain speed and adjusted in intensity. We won’t explain damping again, as you’ve already grasped the concept. It’s up to you to try it out in game, and see if you find it indispensable!
Driving Reverse
The last effect we’ve seen today allows you to adjust the force feedback in reverse. A useful addition, even if you don’t need it every day..
Saved game profiles
If you return to the Game Profiles page, you’ll be able to create save settings. These are in addition to the 5 that you can always have at your fingertips with your steering wheel. This may allow you to create settings for more games or more vehicles (why not…).
On the other hand, I’d like to point out that I’ve sometimes had minor problems with these savegames. For example, when loading a save on my setting n°1, it sometimes made me skip setting 4 or 5. It doesn’t happen every time, I’d say it happens once in 10, but at least you know it can happen.
Of course, in this case, you’ll just have to reload the deleted setting and everything will be fine 😉
The truth about force feedback (and why you shouldn’t listen to anyone)
1- Force feedback is very subjective. Everyone has different tastes in it. What works perfectly for one person will be horrible for another. In fact, every time I’ve downloaded settings made by other people, they’ve ended up in the bin after just 5 minutes of testing. Make up your own mind!
2- Force Feedback is not intended to copy what a car steering wheel does in real life. Because in real life, it’s not just the steering wheel that tells you what your car does, it’s your senses! Sight, vibrations through your seat, body movements and G-feelings..
The challenge is to transmit as much of this information as possible, which would normally pass through your whole body, just through your 2 hands. The job of force feedback is to give you this information as clearly, precisely and quickly as possible. So you need to find a setting that gives you precisely what YOU need to feel the limits of your vehicle… All the rest is junk. I’m not saying it’s bad… but it’s not what makes you good (not on the track, anyway ^^)
Phew! We’ve taken a tour of the Fanalab’s FFB settings
Have you figured out the Fanalab yet? You’re ready to create the ideal force feedback that will give you exactly what you need. If I had only one thing to say to you, it would be: don’t let it go to your head. Get out on the track and try out the settings one by one to find out what you like and what you don’t like. For me, it took about fifteen minutes to find the settings I like. For Flo, it took a total of 23 minutes. In short, it’s quick and easy, and one that’s rarely done.
If this article has helped you, don ‘t hesitate to let us know in the comments! It really wasn’t easy to find understandable terms to explain each setting, and I hope we’ve been able to clear it up for you!