The world of simracing pedalboards is, let’s face it, a mess. Technologies haven’t been evolving for years, players can choose between copies of copies of copies… And in the end, nobody knows which model to choose. But in the midst of this chaos, there are still brands that want to bring something new to the table. The Asetek Forte pedalboard is just such a product, with the ambition of bringing something better to the simracer, without killing it financially.
Asetek sent us a copy of their mid-range pedalset for a full review. Priced between €449 and €545, this model is just above the Fanatec Clubsport V3 in terms of price. But the brand’s ambition is to make it comparable to top-of-the-range hydraulic models in terms of feel and performance.
During these tests, we’re going to tell you exactly what we experienced in terms of settings, comfort, performance… All to define together whether this is a successful gamble for the Danish brand. And above all, whether this model has a place in your simracing chassis😉
What does the Asetek Forte pedalset look like technically?

| Compatibility | PC |
| Pedals | 2 (accelerator-brake) |
| Gas pedal | Spring movement Magnetic sensor 16-bit resolution 2 springs supplied (Medium, Hard) |
| Brake | Interchangeable elastomer movement Load Cell 16-bit resolution 3 elastomers supplied (Soft, Medium, Hard) |
| Vibrations | No |
| Connections | 1 USB-C output to PC or Asetek base (supplied: 1 USB-C -> USB-A 1 USB-C -> USB-C) |
| Options | Asetek Forte Pedals S (separate gas pedal and brake pedals) Invicta or La Prima clutch Invicta upgrade kit (hydraulic module, pedal pads) Footrest brackets |
Design and ergonomics
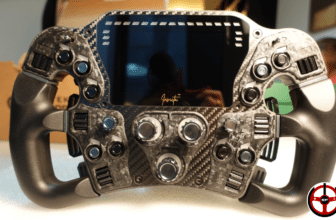
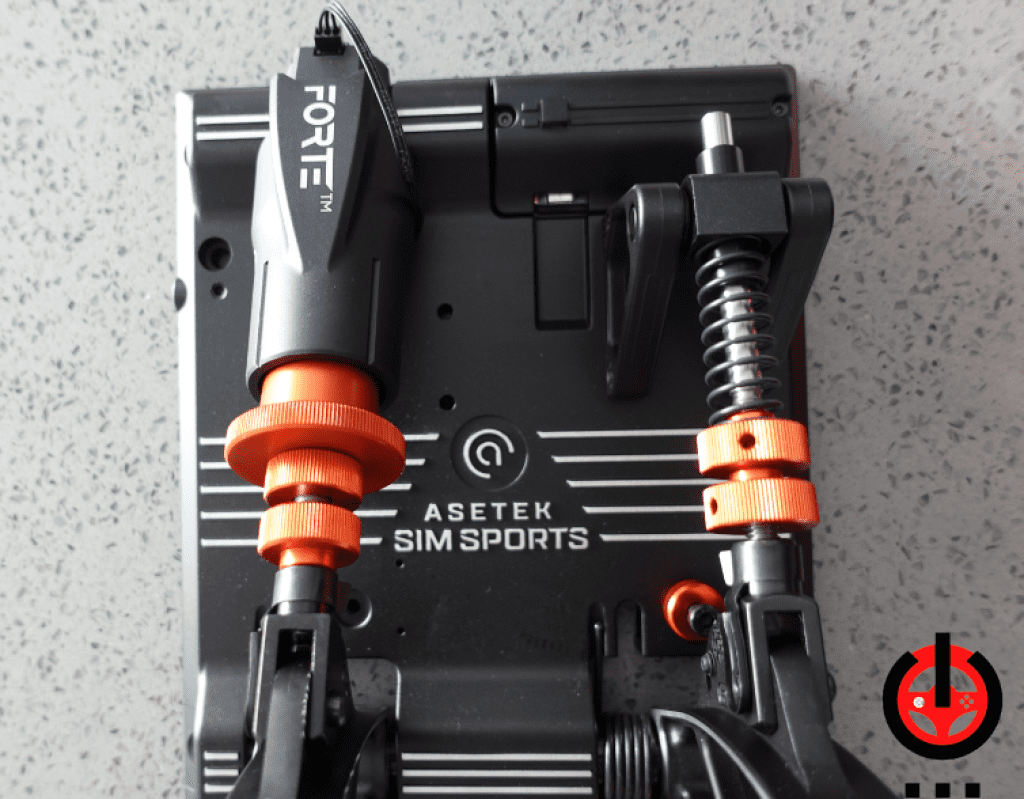
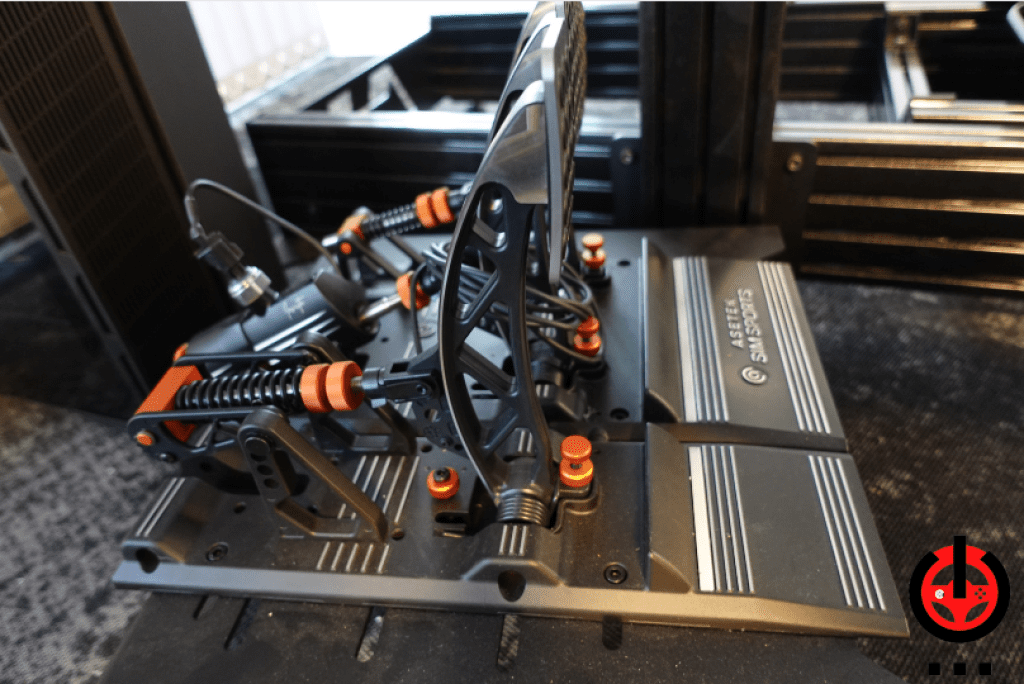
You either love Asetek design or you don’t. But if there’s one thing everyone can agree on, it’s the quality of the components and assemblies. Quite simply, this is an all-aluminum model. From the plate to the inserts, everything is made from the same material.
The footplate has a two-tone finish (black and brushed aluminum) and grooves to give your shoe heel grip.
Then, just in front of the heel rest, there’s an LED strip whose color and intensity can be adjusted in a matter of seconds via the RaceHub software. But more on that later.
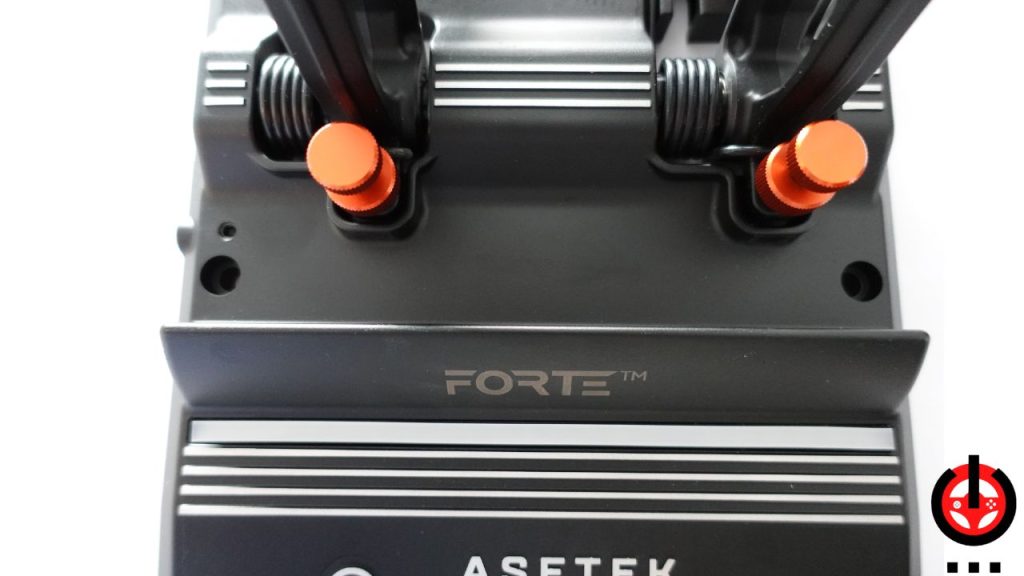
Another eye-catcher are all those orange knobs and elements on the pedalset. In reality, these are simply all the settings you can operate without tools.
Because yes, ladies and gentlemen, well… gentlemen if I’m to believe the blog’s visitor statistics… Everything on this pedalset is adjustable by hand, without even needing to remove the pedalset from the frame once it’s been installed!
A pedalset built to last
Everything exudes quality, and for good reason: these are precisely the same components as the Invicta pedalset, the brand’s top-of-the-range model. As you can see, we’re talking solid materials here. The pedal arms, for example, are capable of withstanding a force of 700Kg before letting go. In other words, you’re going to have to join the gym if you’re going to destroy them.
But the quest for durability doesn’t stop there. The Load Cell brake cylinder is also designed to enhance the durability of elastomers. Since they’re trapped in a cylinder, they can’t be over-activated and thus wear out prematurely. And the Load Cell can withstand a force of 200Kg. Let’s talk about the brake, because it’s a new feature!
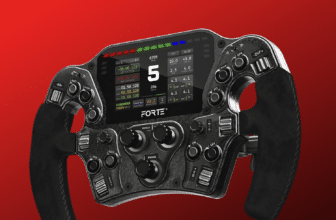
The M.L.C.P.C. module
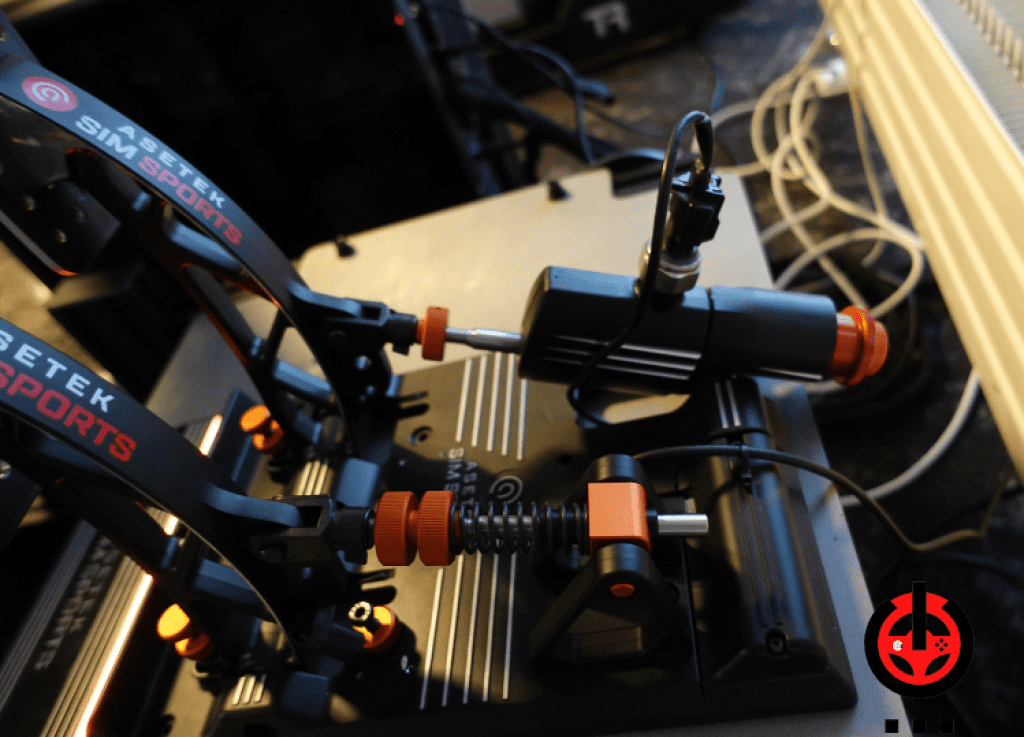
Behind the brake pedal is a strange black cylinder topped by an imposing orange nut. This is the Mecanical Load Cell Powered Cylinder (MLCPC), the braking system created by the brand to replicate as closely as possible the feel of a hydraulic brake on a Load Cell model.
This cylinder, in which the elastomer is enclosed, enables a 12mm compression movement by the elastomer, and then we arrive at the second, very hard braking phase. This second phase is managed by the rubber on the back of the orange ring.
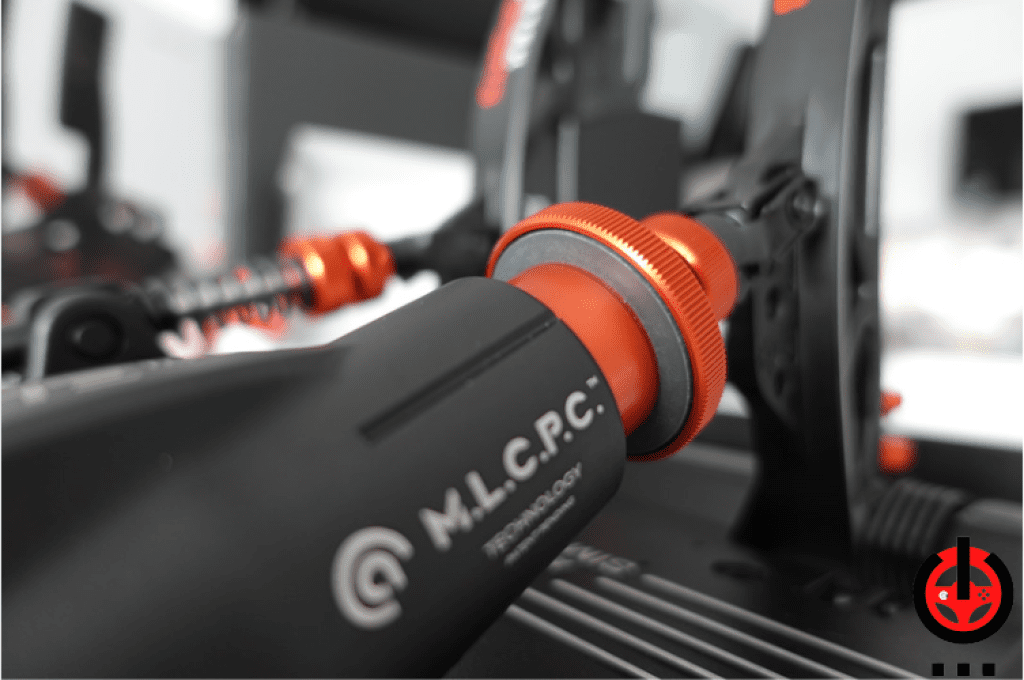
In fact, you could say it’s a 3-phase braking system. First, you can choose whether or not to have a very soft zone that simulates the natural mechanical movement of the pedal. Then you have the hard elastomer phase, which simulates the pressurization of the hydraulics. Finally, the very hard phase gives the impression of pushing against a wall, while still being able to manage downward braking.
What’s interesting to note is that this system doesn’t send the load directly to the Load Cell. In fact, it’s the movement of the elastomer that compresses a spring connected to the Load Cell. In this way, you can change elastomer hardness without ever having to recalibrate your pedalset. Handy for those who want to modify brake hardness according to the type of vehicle being driven!
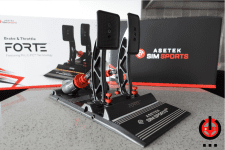
Installing the Asetek Forte pedalset on the chassis
The next step is to install the pedalset on the chassis, because yes: chassis mandatory, of course. Asetek delivers absolutely everything you need in the box. The screws and bolts are complete, and there are even T-nuts for owners of aluminum profile chassis. Allen keys are also supplied.
So, you just put the 4 nuts on and off you go, right? Well, not necessarily. The screw locations are non-standard, so some of us will have to drill our chassis plate first. It’s nothing new, but unfortunately this is often the case.

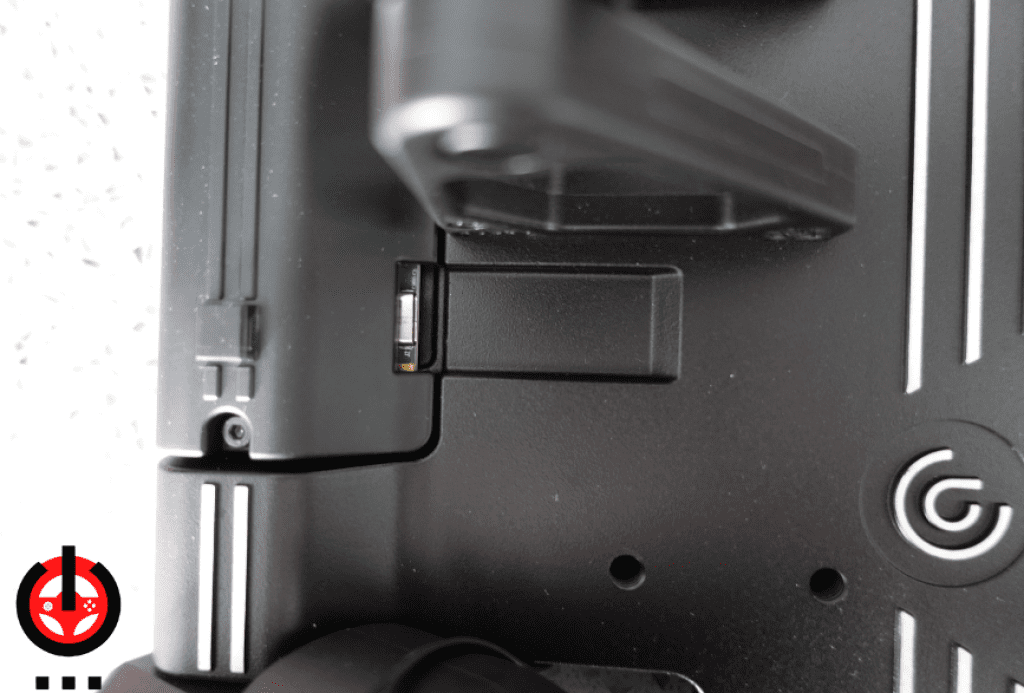
Connection is via USB. You can either connect the pedalboard directly to your PC or to your Asetek base unit. In either case, cables are supplied.
You’ll notice, however, that the USB port is directed towards the inside of the pedalboard. So you’ll need to plug the cable in and then turn it back to secure it with the supplied collar.
But why not point the USB port directly outwards? We asked Asetek. They didn’t want anyone to be able to accidentally pull the cable out or damage the USB port.
Adjusting is child’s play!
Setting up a simracing pedalboard has never been so easy. Tired of crawling under your chassis with a toolbox and your head banging against the steel brackets? The Asetek Forte can be fully adjusted by hand in a matter of seconds.
Throttle settings :
- Pedal angle
- Stop
- Spring hardness (2 springs supplied)
- Spring pre-loading to increase attack hardness

Brake settings :
- Pedal angle
- Area of movement before reaching the elastomer
- Elastomer hardness (3 models supplied)
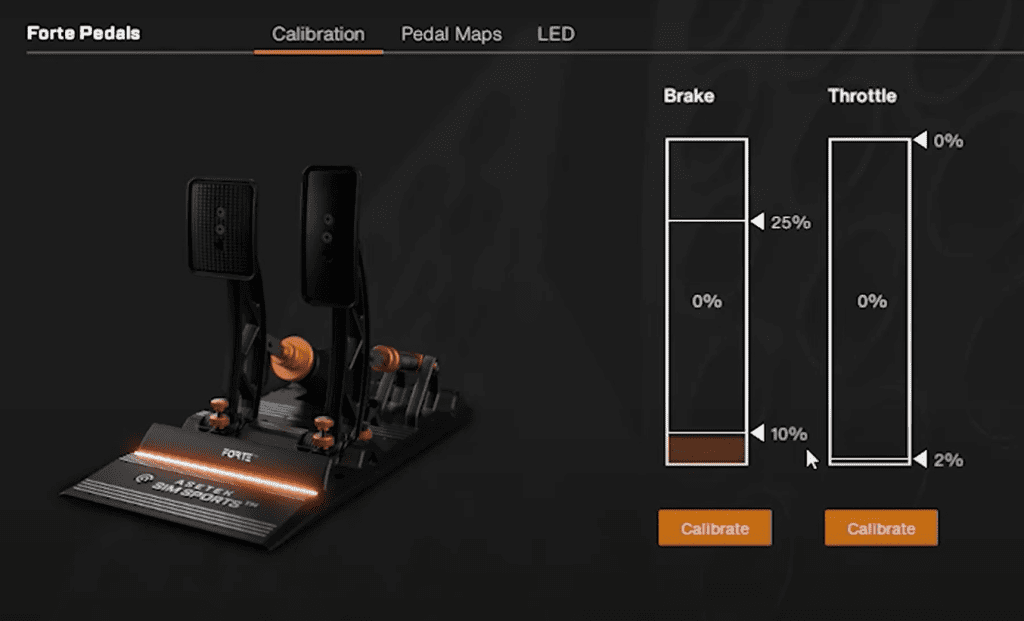
Setting up the RaceHub software
Now it’s time to calibrate the pedalset on the RaceHub software. Dead zones, pedal limits, progress curves… You can do what you want and more.
It’s also in this software that you can change the color of the pedalset’s LED strip. Not much else to say about this software, which is extremely simple yet complete.
Comfort and feel: a slap in the face (but not yet)
André Eriksen, Asetek’s CEO, wanted these pedalsets to replicate exactly what his own experience of racing cars had taught him. That is, very hard brakes with a very short pedal stroke. This is quite unusual in the world of simracing. We’re usually much more used to soft pedals with long stroke, especially in this price range.
So how good is this brake, so different from anything else on the simu market? And what can it bring to the player in terms of feel and performance? I can’t wait to find out, so let’s get on with the test!
My first (big) mistake
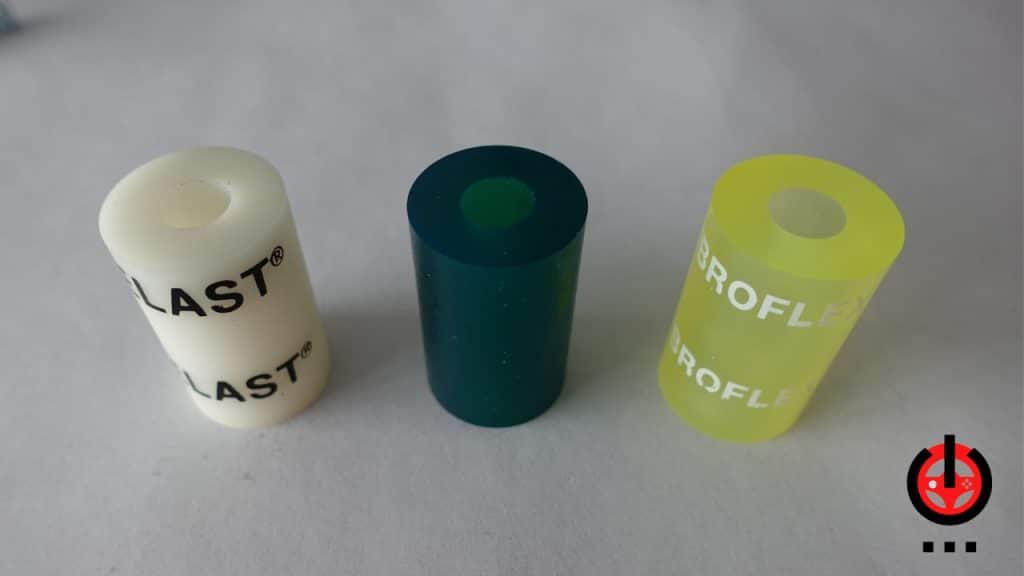
I was excited to get started, and so was Sam. In short, things were crazy at home. The problem was that during these first tests I made a mistake that cost me a lot of time and frustration… Let me explain: Remember that Asetek supplies 3 elastomers with the pedalset?
- Soft for road vehicles
- Medium for GT cars
- Hard for Formulas and Prototypes
As standard, the brake pedal is fitted with the Medium elastomer. And the Medium was already a lot harder than any pedal we’d ever had between our feet. So I did a few laps with it and then I wanted to try the hard one. Except that during the few laps I did with the hard one, I really couldn’t brake properly. Either I was braking too little and ended up in the gravel trap, or I was plowing like crazy, throwing myself on the pedal and locking the wheels… To end up in the gravel trap too. So out of frustration, I switched to the soft elastomer.
A fatal error, and the time has come for regrets.
What Gérald De Palmas might have said about this first test.
I’m back on the virtual road and all’s well! Of course, it takes a little time to get used to the two-stage braking and the very short run, but I’m getting the hang of it. After a few days of testing, I’m comfortable enough to stick to my usual times, everything’s going well and I’m relatively happy.
You have to accept the concept of the pedalset to appreciate it
Before I go any further, I must tell you something. I love hard brakes. Since we tested the Invicta, I never want to hear about soft brakes again. So I immediately kick out the soft elastomer and replace it with the hard one.
If you’ve never seen our videos, I weigh 45kg with winter clothes and Moon Boots. So Sam is skeptical. But I love it! Of course, I can’t push the brake all the way, but I love the feeling. So Sam is thinking maybe he should try the hardest setting again. You know, the one that André Eriksen, CEO of Asetek, puts forward because that’s what corresponds to the real racing cars he’s driven.
Fatal mistake, Sam should have listened to you…
What Sam should have said to André Eriksen about pedal hardness
As a reminder, at this stage Sam already used to the very short brake travel (which will help him for what’s to come). He takes to the track on Assetto Corsa. The track? Suzuka. The car? The VRC Formula Alpha 2022 model. Driving assistance OFF. Sam knows this model like the back of his hand, it’s the car in which Sam has done the most mileage this year. And He has been sanding this track since he was 9 years old on every car game he could find. If there’s one combo where he can give it all, it’s this one.
When you let the Asetek Forte express itself…
I do a first warm-up lap. The brake is very hard, but I feel I’m handling it much better than the first time. I do a few small braking tests during this first lap to get my bearings and I have the impression that I’m already managing my regressive braking better. Interesting! Maybe I’ll be able to brake later then?
I accelerate hard to start my hotlap! As soon as I hit the first bend, I try something crazy: braking twenty meters later than usual. And it works! Thanks to a perfectly executed downshift, I manage to balance the car perfectly and come out like a bomb. The bends follow one another, the control is total, I feel like a balancing act in the middle of a feat. Each braking maneuver is better than the last, I’m gaining confidence and getting into situations where normally I’d have locked the wheels or lost my balance. It’s a blast. After a final chicane on the wire, I arrive at full speed on the straight, engage the DRS eeeetttt….
PERSONAL BEST BEATEN BY A SECOND. Well, actually a little less… 0.943 to be precise, but still! One second, one P*T*IN of a second. Can you believe it? It’s an abyss, a canyon. At the end of a grand prix, that’s almost 1 minute’s advantage over your rivals! And yet my previous record was achieved with a pedalset I’d known for years and on which I was (or so I thought) extremely comfortable.
What makes the Asetek Forte so powerful?
But what justifies this performance? Well, if I had to sum it up in a single word, it’s “Degressive”. I’ve never been so at ease with regressive braking with any other type of pedalset. All thanks to the hardness of this brake and its feel, which really gets the muscles and muscle memory working. And I can guarantee you one thing: once you get used to this degree of hardness and precision, everything else will feel (as André Eriksen says) like a soft potato.
But does the Forte offer the same feel as the Invicta?
A pertinent question. Let’s not forget that the M.L.C.P.C. system is designed to replicate the Invicta’s hydraulic module. But before answering, I’d like to point out– and this is very important – that all in all, I only had the Invicta in my hands for 3 hours. Whereas I used the Forte for over a month on a daily basis.
Now that I’ve said that, here’s my answer: Not quite. The big difference between the two is the final braking phase. On the Forte, you’ve got this rubber under the crown that gives you just a millimeter more travel to push the brake all the way. On the Invicta, when it’s hard, it’s HARD. You’re literally pushing metal against metal. And it’s the hydraulics that transfer all that force to the sensor.
But in terms of overall feel, the fact of having these two very distinct and very hard braking phases is something that both the Forte and the Invicta do. So I’d say the gamble paid off.
Upgrading your Asetek Forte over time
One of Asetek’s great strengths is that their products are upgradeable. Remember when I told you that the Forte was built from the same parts as the Invicta? That’s no accident. It’s simply to enable you to transform your mid-range pedalset into a high-end one. Just buy the T.H.O.R.P. kit: one screw to loosen, one cable to disconnect, and off you go! There are also two clutches, the La Prima and the Invicta , which allow you to add a third pedal to your set in just a few minutes.
What we thought of the Asetek Forte Pedals model