Today I’m pleased to share with you the test of the Rexing Mayaris 2, a 4-screen Formula steering wheel handcrafted with passion by the Croatian company Rexing. And as you’ll see, whether in terms of finish, functionality or price, this steering wheel has it all. I got a real kick out of the month of testing I spent with it, and I’m sharing the whole experience with you!
Rexing Mayaris 2 in brief the Best
What does the Rexing Mayaris 2 look like technically?

| Diameter Weight | 29cm, 1,150Kg, 1.240Kg with optional third set of pallets. |
| Materials | Carbon fiber, composite, aluminum, plastic. |
| Grips | Polyurethane |
| Paddles | Standard: 2 magnetic shift paddles, 2 analog paddles for Dual Clutch. Optional: 2 high-mounted Push/Pull paddles for DRS and Push-To-Pass, or access to additional functions. (150€). |
| Vane operating noise | 76dB |
| Customizable buttons | 10 configurable backlit buttons, 4 thumb-level rotary encoders, 2 clickable thumb rotary encoders, 2 8-position rotary selectors set at positions 0 and 8. 1 rotary selector in the center of the steering wheel with clickable infinite rotation. 2 7-position switches. A total of 123 functions. |
| Rev counter | 11 configurable LEDs |
| Flag display | 6 configurable LEDs |
| Screen | 1 5-inch 854x480px touchscreen. 3 OLED screens with 3-line display. |
| Quick Release | Standard: aluminum HUB with 3×50.8mm and 3x70mm centers. Optional: pre-installed Asetek QR (150€) |
| Compatibility | PC – All market bases with QR sold separately. |
| Price | from 1360€ HT |
Design and ergonomics
Right out of the box, you get your first slap in the face. The design, inspired by Mercedes F1 steering wheels, is a real success, although this is obviously subjective. But in terms of finish, it’s quite simply the highest-quality steering wheel I’ve ever had the pleasure of reviewing.
The first thing that catches the eye is the 5″ touchscreen, which takes up a massive space in the center of the steering wheel. Then we discover the 3 OLED screens placed above the central encoders, which will be used to switch from one operating mode to another of said encoders.
The eyes light up as we take in the full extent of the carbon/epoxy finish, glossy at the rear to enhance the carbon fiber and matte at the front to avoid reflections. This fiber shell serves as the structure of the steering wheel, which needs no internal reinforcement to ensure its rigidity (which is flawless). What’s more, the Rexing team itself produces the materials!

In the box:
- Rexing Mayaris 2 steering wheel
- 4 sticker sheets to customize the steering wheel’s functions
- 2m spiral USB cable
- Screws and bolts for installing your Quick Release
- QR code for complete online instructions

Functions you won’t be able to live without
Surrounding the main display are 11 smoked LEDs for the lap counter and 6 LEDs for the flag displays. The 10 backlit buttons have a very satisfying click, which we measured at an average of 500gr for a displacement of 0.2 to 0.3mm (unfortunately difficult for me to make a more precise measurement in this order of magnitude). On each side, around the thumbs, there are 3 rotary encoders ; -. The two just above the thumbs are relatively soft, but the other two are harder and very precise. 2 7-position switches are also included. Finally, there’s 1 rotary encoder – in the center – with 4 operating modes, and 2 absolute 8-position encoders (1 function per position), each with 3 operating modes.

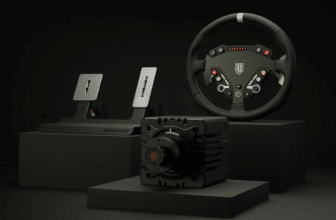
Efficient, silent paddle shifters
The Rexing Mayaris 2 is equipped with 4 paddles as standard for shifting gears and Dual Clutch. Two magnetic paddles (for the gears) require 1.5Kg of force to activate. They are quite quiet, with a peak noise level of 76dB. The sound is very “muffled”, making it neither perceptible nor pleasant. The paddles are made of carbon fiber with chamfered edges. They can also be adjusted in width by means of 3 series of holes, each spaced 5mm apart (i.e. a total width travel of 1cm).

I’ll now move on to the H.A.L.L. sensor analog paddles (spring-loaded movement). For most players, these will be used as a Dual Clutch. Their pads are also made of chamfered carbon, and their 100% activation requires 1Kg of force. They are not width-adjustable, but their large pads fit perfectly under both Flo’s and my fingers, even though our hands are not at all the same size.
Optional Push/Pull paddles
Let’s move on to the third set of paddles, sold as an option for €150. These paddles are positioned above the gearshift paddles. This time, movement is ensured by a ball on each side of the movement, which depresses on activation. The plates can be adjusted in width with 2 choices spaced 5mm apart. They require much less force, only 500gr, and there’s a reason for that. In fact, these paddles are Push/Pull. This means they can be pulled but also pushed. And given that you’re going to have to do this with the tip of your index finger, having paddles that are too hard would make them difficult to use.
Push Pull means 4 functions instead of 2 on conventional paddles. But that’s not all, I was pleasantly surprised to discover that these paddles could also have an extremely useful function, 100% customizable by the player: multi-input.
So what does multi-input mean? Well, I’ll be able to choose, for example, that when I push forward on the left palette, it sends 2, 3, 5, 10 times (for example), the function of the button I’m going to press at the same time. Don’t you get it? Yes, it’s not clear ^^ I’ll give you a concrete example:
Concrete use case :
In my case, I’ve chosen to make sure that when I push the left palette forward and press another button/palette at the same time, it sends 10 times the input of the button/palette I’ve just clicked. Let’s imagine I spin out in the middle of a run and am forced to reverse. Rather than clicking 5 or 6 times on my downshift paddle, I’d simply push the top paddle, click once on my downshift paddle and the steering wheel would downshift by itself 10 times, sending me into reverse.
I can also use this function to quickly change the front/rear brake balance during a race without having to click repeatedly on the balance knob or turn a rotary selector several times. It’s extremely handy when racing, and I personally can’t do without it now. And of course, I can also choose to put this type of function on any of the 4 positions of these paddles.
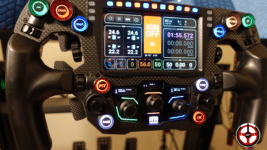
The first steering wheel with 4 screens, because why not!
Ah yes, I suppose you noticed? There are 4 screens on this steering wheel. So, at first glance, you might think that this is a pointless delusion that will only appeal to vroom vroom gogos. But it’s not! In fact, each of these screens has a very specific function, and I’m going to tell you all about it.

The main 5-inch screen is touch-sensitive. There’s no mystery about it: this is the one you’ll be using to place your most beautiful Dash! With its 854x480px resolution, I’ll admit I was a little skeptical at first. I was worried it might lack clarity, but in fact it’s not at all. It’s precise, sharp, and of course 100% customizable with SimHub.
But it doesn’t stop there!

Well, in real life the displays are perfectly clear, the photo clearly doesn’t do it justice, but we couldn’t do any better ^^
Above each central rotary encoder is a dedicated OLED display. It’s on these screens that you’ll find the mode and function activated on your encoder in real time. You can change the display size and rename all modes and functions directly from SimHub.
Don’t know what these modes and functions are? I’ll tell you all about them in a few minutes 😉
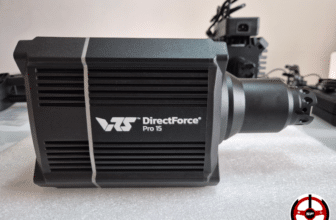
Installing the Mayaris 2 on any base
To install your steering wheel on the base of your choice, the Rexing is equipped with an aluminum HUB with 2 different center distances. A 3×50.8mm center distance and a 3x70mm center distance. This means you can fit any Quick Release on the market. For owners of Thrustmaster or Logitech bases, Rexing can supply a 3D-printed QR adapter at no extra cost.
If you choose to install it on a Fanatec base, you’ll need either the Podium HUB to ensure that your base activates its force feedback. Or a Sim Racing Machine (SRM) adapter, which we’ve already seen.
Connection to the PC is via a 2m cable, with aviation attachment on the steering wheel side to prevent it from being ripped off, and USB on the PC side. Connecting the steering wheel to a powered USB port is recommended, but not mandatory. But if you notice that your steering wheel switches off and on unexpectedly, then switching to a powered USB will solve the problem.
The Asetek Quick Release can be supplied directly with the steering wheel
As one of Asetek‘s partners, Rexing is able to supply an Invicta QR directly installed on the Mayaris 2, as an option for an additional 150€. But please note one thing! If you take this option, you won’t receive the accessories (shaft extensions) normally supplied with the Asetek QR.

Personally, I installed an Asetek Invicta QR that I already had at home. Rexing supplied me with a mini cable to connect the steering wheel directly to the QR, so there’s no longer any need for a long, unsightly cord to wrap around the steering shaft – and that’s a pleasure!
Features galore!
No fewer than 123 different functions on this steering wheel at the time of writing. The reason I mention this is that, depending on the update, new features may appear over time. In other words, it took me some time to get used to this profusion of functions, and to decide which “racing” functions I was going to associate with which buttons or encoders. Because the real talent of this Rexing steering wheel lies in the advanced functions it offers. The list is as long as your arm, so I’ll leave you to discover the Mayaris 2 manual to find out all about them. But I’m going to tell you about the ones that clearly caught my eye:
The central encoder and its 4 modes
Let’s start with the central encoder at the bottom of the steering wheel. This little encoder has 4 different operating modes, all incremental ( ; -). To switch from one mode to another, simply click on the encoder. Each mode can be renamed so that its name appears clearly on the OLED display just above it. Not using all 4 modes? No problem! You can choose to remove them from the steering wheel’s internal menu, so you don’t have empty functions lying around while you’re driving.
It’s also via this encoder that you access the steering wheel’s internal menu, which allows you to set and calibrate everything imaginable. Press the encoder for a full second to launch the menu, which is then displayed on the OLED screen.
The 8-position encoders and their 3 modes
Let’s move on to the “center-left” encoder. This is equipped with 8 absolute positions and 3 different operating modes, activated by clicking on the rotary encoder on the left thumb. Mode 1 lets you use it “normally” as an 8-position encoder. Mode 2 lets you use the encoder to select the function of button n°6 at the bottom right of the wheel. And mode 3 lets you choose the function of the rotary encoder ( ; -) on the right thumb. Not clear? Take a look at the test video, it would be more visual ^^. Of course, it too has its own OLED display screen, and each function of each mode can be renamed.
Finally, I’d like to turn to the 8-position “center-right” encoder. This changes function when you click on the right-hand encoder located near your thumb. And it has 3 re-nominable operating modes and an OLED screen, of course. For him, no “excessive frills”, each mode just changes the use of the 8-position selector.
Dual Clutch with 6 adjustable friction points
When Rexing makes Dual Clutches, they take the idea to the extreme! Not content with already being able to change the friction point directly from the steering wheel menu, you’ll also be able to save 6 different friction points. What’s in it for you? Calibrate your friction point exactly to your car or simus, to ensure you get off to the best possible start. All this, without having to go back to the tuning stage every time you change car or track.
And because, after all, “why not”: you can also choose between Auto Priority mode, which automatically sets the main and release palettes at the friction point. Or set a fixed rule for each of the 2 clutch paddles.
Comfort and feel
Let me tell you something. Normally, a steering wheel test takes 2 to 3 weeks max. That’s less time than for a rig or pedals, which usually take 3 to 4 weeks, because there are fewer “technical” things to analyze and fewer settings to test. Well, for the Mayaris 2, I enjoyed dragging out the test for over a month.
The comfort of the grips, which fit perfectly in the hand, the ergonomics of the buttons, which fall naturally under the thumbs, the pleasure of activating the paddles, the legibility of the screens and LED displays… All these elements make riding on this steering wheel extremely pleasant. For me, in terms of on-track comfort, it’s flawless. Everything has been thought out with the hands in mind, from the choice of encoders to the perfectly finished chamfers wherever your thumbs might venture.

On the track, once you’ve taken the time to tame its functions, you quickly become one with the beast. This steering wheel is a real jewel. A totally unreasonable gift of life, of course, but one that I felt I had to share with you.
My verdict on the Rexing Mayaris 2