The Spa Francorchamps circuit is one of the most legendary tracks in the world. This week, we bring you a trajectory tutorial for this legendary circuit. On the program: a little history, but above all a turn-by-turn school trajectory. This will help you boost your performance on the circuit, both virtually and in real life!
SimRacers friends, this circuit tutorial was produced with the invaluable help of our partner VR Coaching. The trajectory proposed here is an academic trajectory which allows you to get your bearings on the track and then refine and find your own areas of improvement.
VR Coaching is a real track instructor and the advice you are about to read is also ALL applicable on the real circuit.
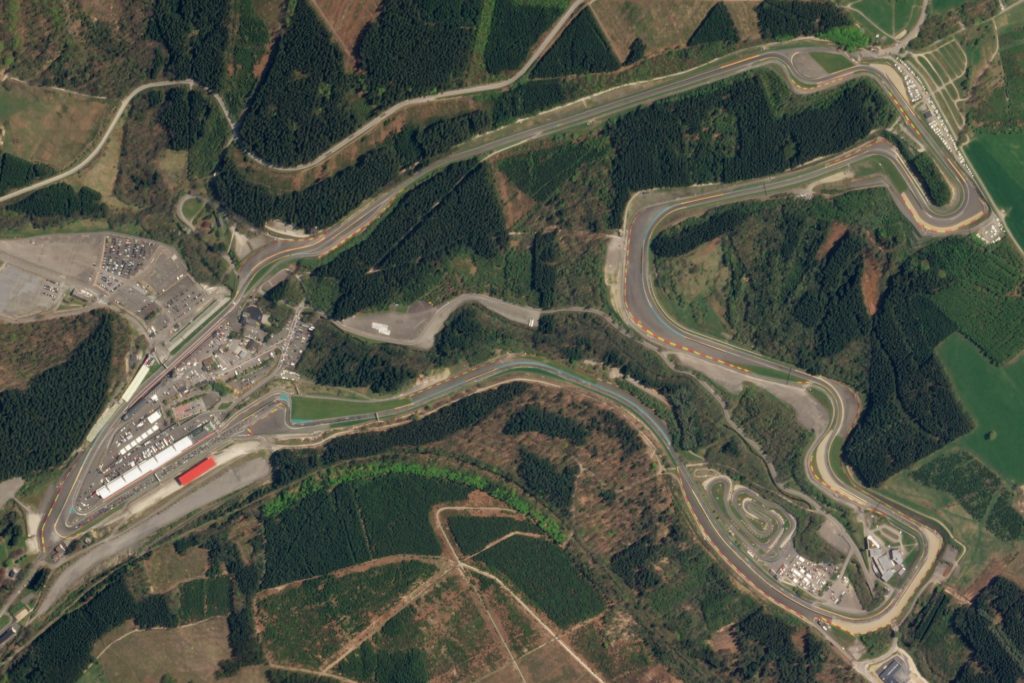
The Spa circuit and its records
The Spa circuit first opened its doors in 1921, and while its layout has evolved over the years, it still retains some of its most emblematic features! Its historic 14.1 km layout was considerably reduced to 7.004 km in 1979, due to the numerous safety issues surrounding the track. Problems that never really went away. Again in 2022, new measures were taken to improve safety in Eau Rouge and on the Raidillon.
The absolute but unofficial track record was set by Lewis Hamilton at the wheel of the Mercedes-AMG F1 W11 EQ Performance in 1:41.252. This record, set in 2020, was achieved in a qualifying session and is therefore not officially included in the circuit’s list of records.
The first official record is held by Valtteri Botas. In 2018 he set a lap of 1:46.286 at the wheel of the Mercedes AMG F1 W09 EQ Power . In GP2, Sergio Perez set the record in a Dallara GP2/08 with a time of 1:56.731 in the 2009 season. In the LMP1 category, Mike Conway set a lap of 1:57.394 at the wheel of the Toyota TS050 Hybrid in 2019.
Last but not least, in GT3 it was Miguel Ramos at the wheel of the McLaren 720S GT3 who in 2020 set the class lap record of 2:16.252.
Which combo for Spa in SimRacing?
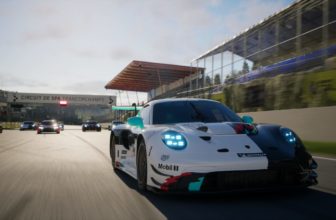
The best option for driving on the Spa circuit today is an Assetto Corsa mod. (or even better, Rennsport, for those lucky enough to have a beta test key). You can click here for the track link. And for those who’d like to relive the circuit’s last F1 Grand Prix or WEC 2023 season, modder Pyyer is the place to be.
If you’re new to the world of AC mods: The must-have mod list!
Today’s suggested car is an Alpine A110 GT4. It’s a more powerful car than the Mazda MX5 we usually use, but if you’ve followed the previous tutorials, you shouldn’t have any trouble with this GT4.
Want to learn how to DRIVE a racing car with SimRacing? Learn the art of piloting with a real BPJEPS qualified track instructor. Mastery of grip, trajectories, track markers, braking, weight transfers… These coachings are the first to offer an approach to simracing as if you were on a real track!
Stage 1: Crossing the line to La Source
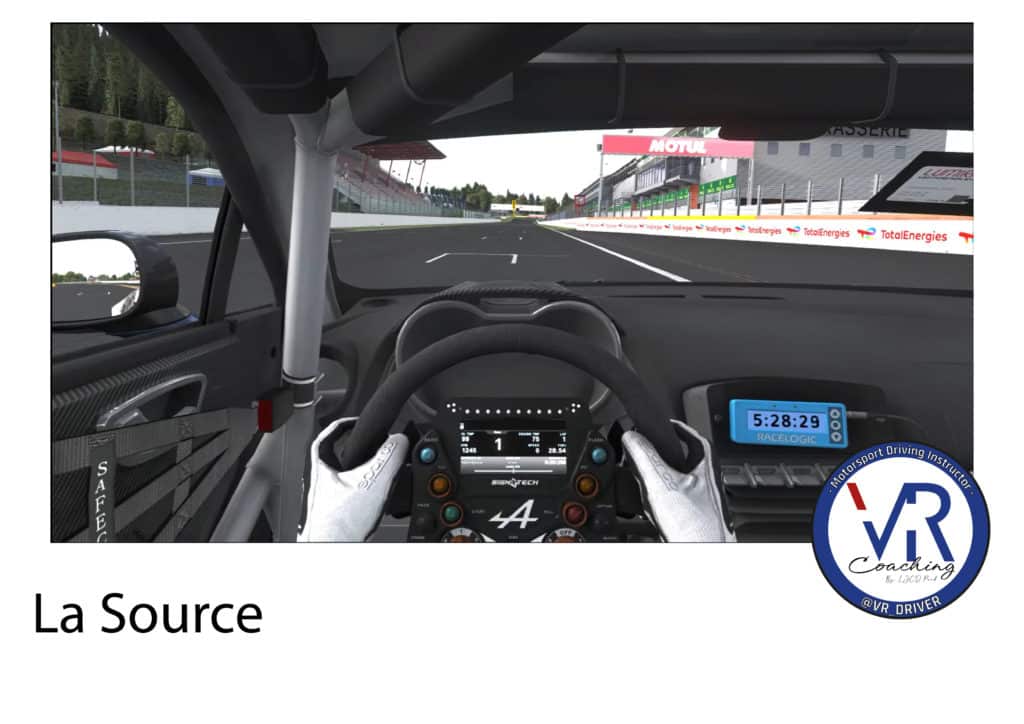
You’ve just completed your warm-up lap and passed the Pit entrance.
Now it’s time to shift to the left so that the car follows the racing line.

Let’s get ready to pass the Source. Depending on the vehicle you’ve chosen, the end of the white wall can be a good braking indicator. With the Alpine we’ve got today, you can still wait about fifteen meters before hitting the brake pedal.
As soon as you pass the billboard on the left, it’s time to steer towards the Source rope.
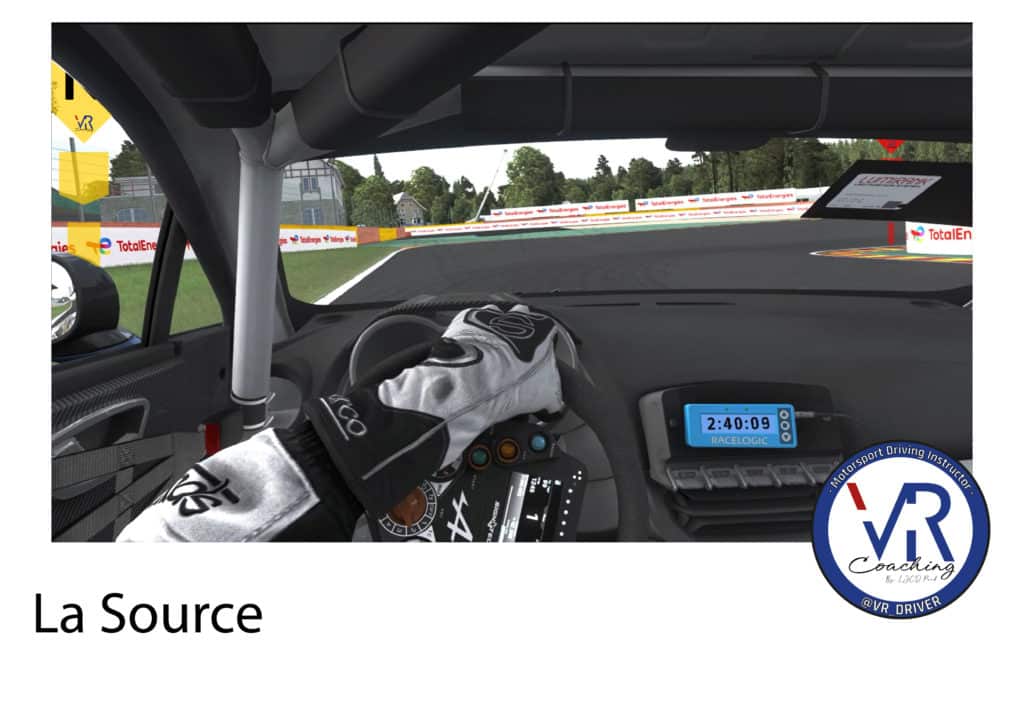
Eat as much of the vibrator as you can, keeping 2 wheels on the track.
For the Source exit, aim for the end of the vibrator on the left. Be careful not to be thrown off the track when re-accelerating.
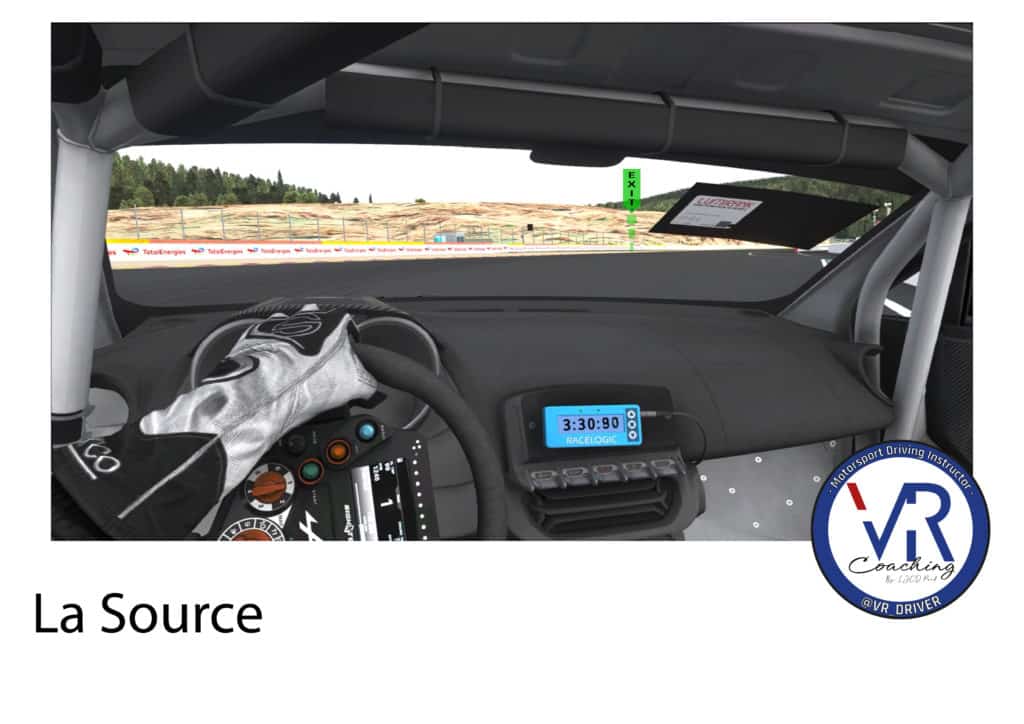
Keep to the left until you reach the end of the gravel trap. Once past the gravel trap, I’ll ask you to head for the low wall on the right. Take your time, we’re going to wind the curve as late as possible, a few degrees of steering wheel angle should be enough.
The later you wind this curve, the more you have a visual on what’s going on down towards Eau Rouge in case you catch up with someone. It also helps to give the car more air by not being squeezed along the wall.
Step 2: Eau Rouge
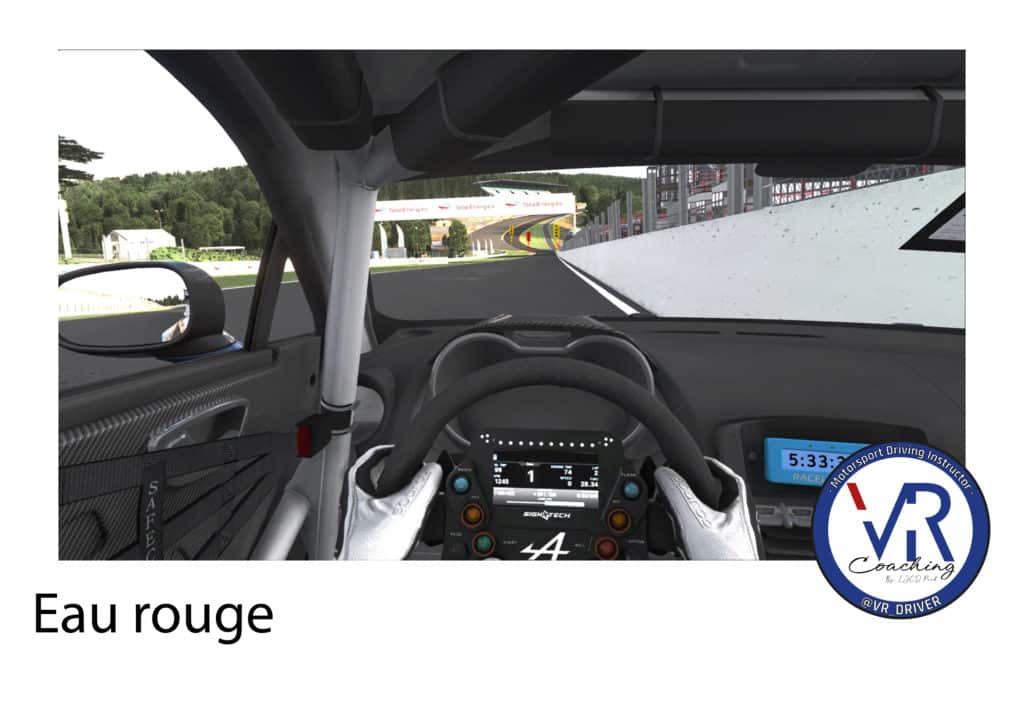
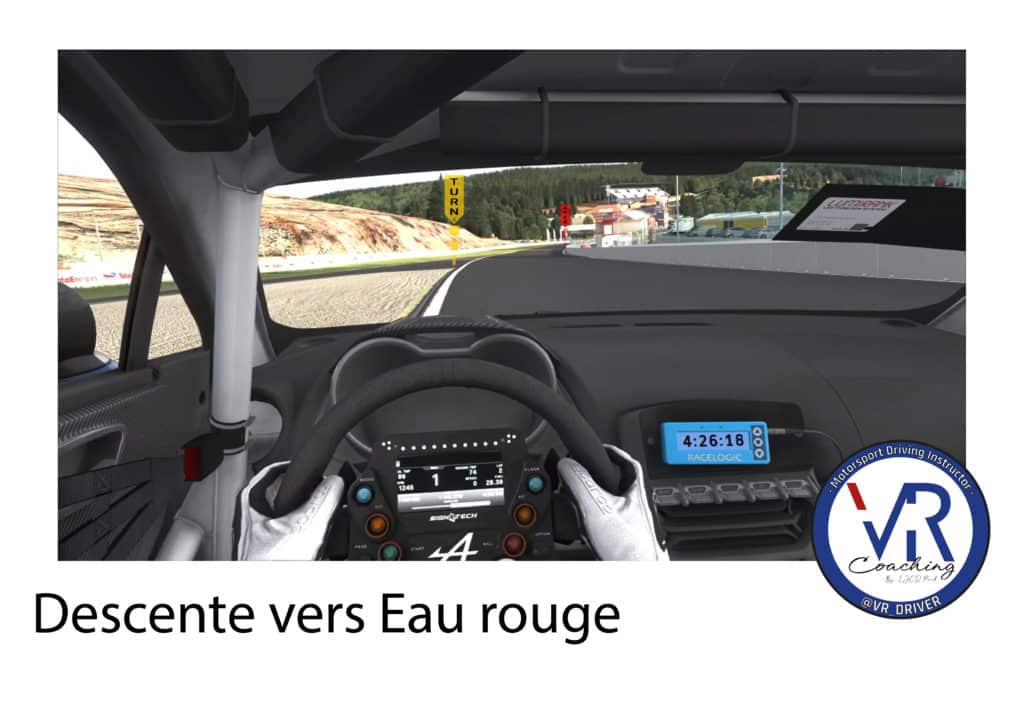
Now that you’ve reached the wall, you’re ready to turn right and put your foot to the floor.

On the actual track, about 10 metres after the asphalt connection you can see on the track, there’s a post with a Wifi terminal on the right. It’s this terminal that serves as the turning point to Eau Rouge.
Since the game doesn’t have this landmark, you can use the commissaire’s booth to tell yourself to turn right before it.
You can find the missing post (and other details) on this page!
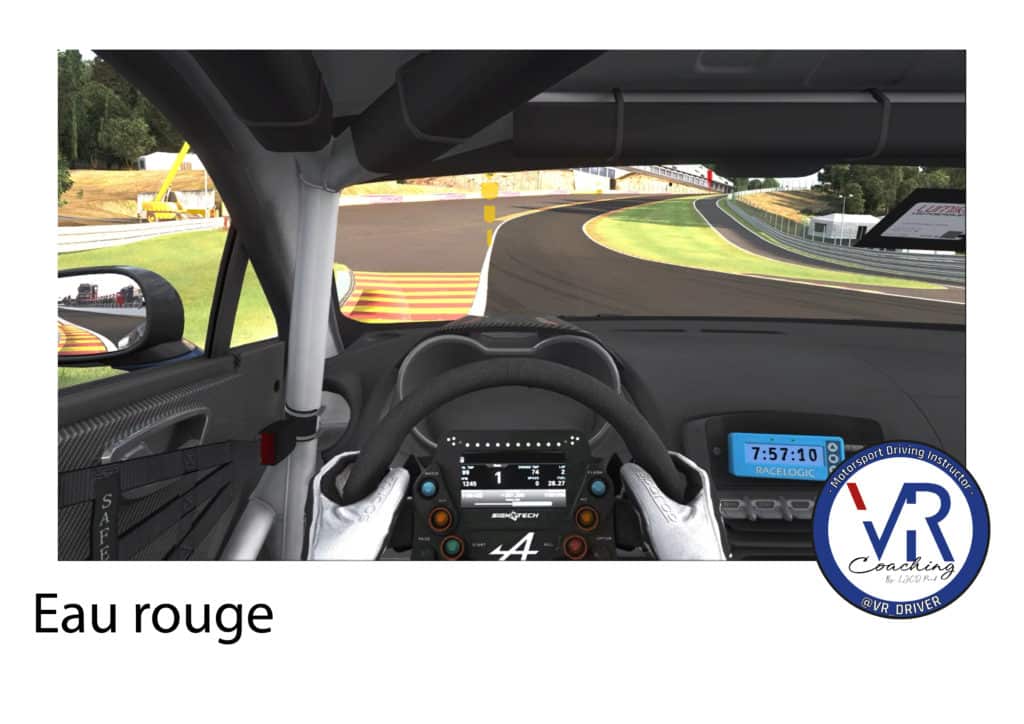
To enter the bend, aim for the end of the left-hand vibrator and steer along the right-hand vibrator.
Stage 3: the Raidillon
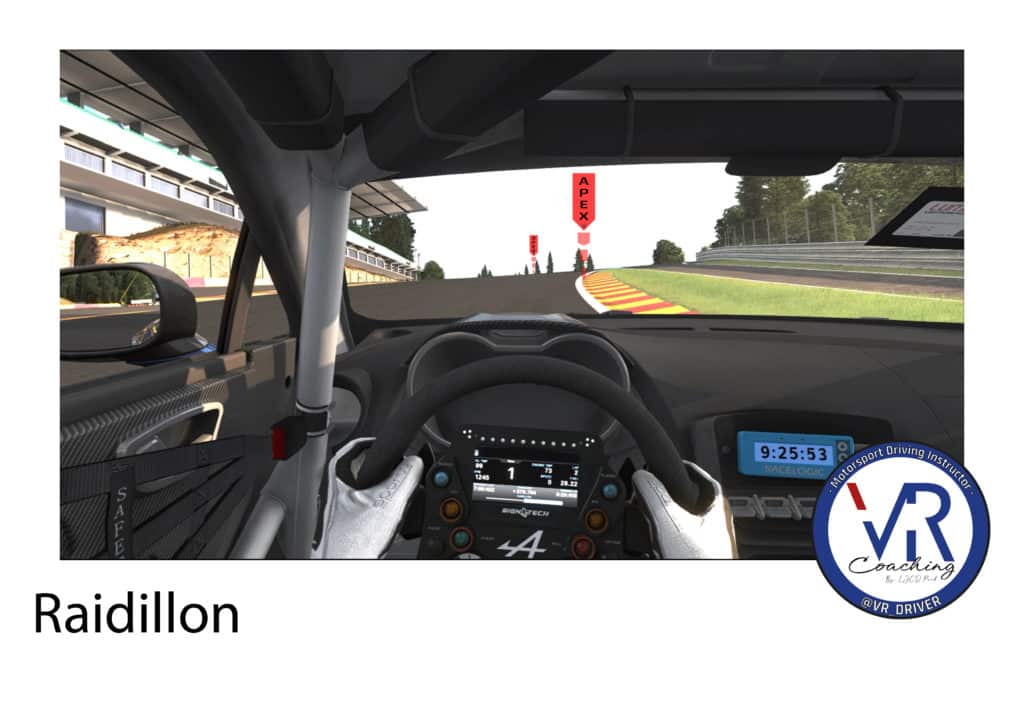
In the real world, the vibrator has a white slab where the right-hand bend narrows a little. This is the chord point. Since it’s not present here, you’ll have to aim for the tip of the bend where the right-hand bend tightens up.
Can you see the three fir tree tops clustered together? As soon as you hit the apex of the Raidillon, it’s the central peak that we’ll be aiming for at full throttle.
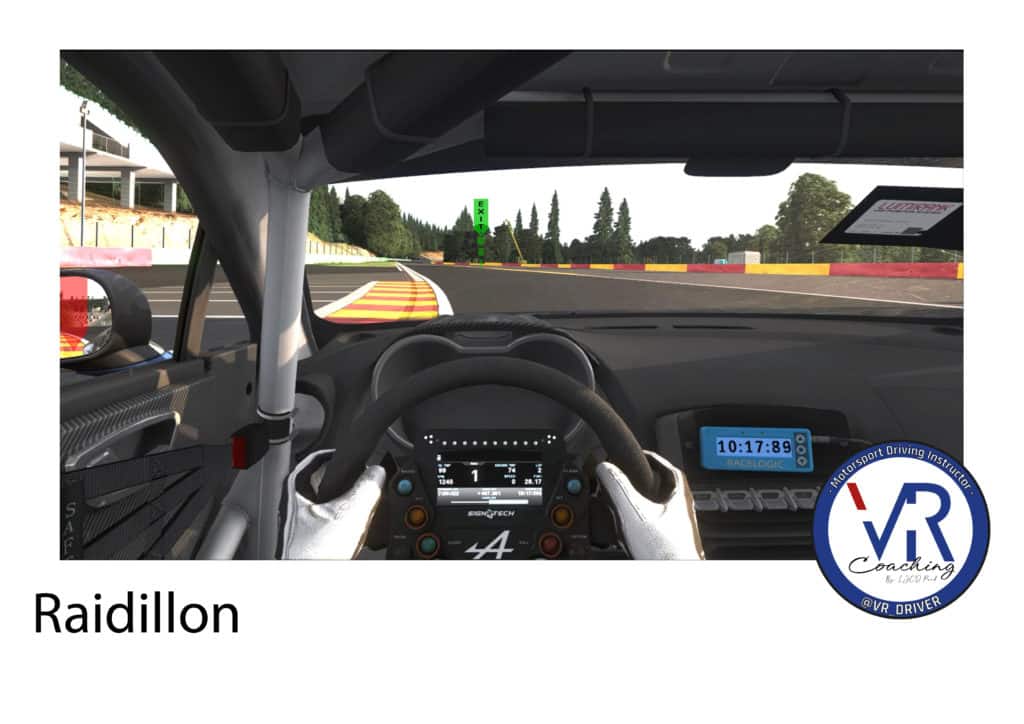
You can now widen out towards the end of the vibrator on the right to follow the racing line.
Stage 4: full throttle on the Kemmel straight
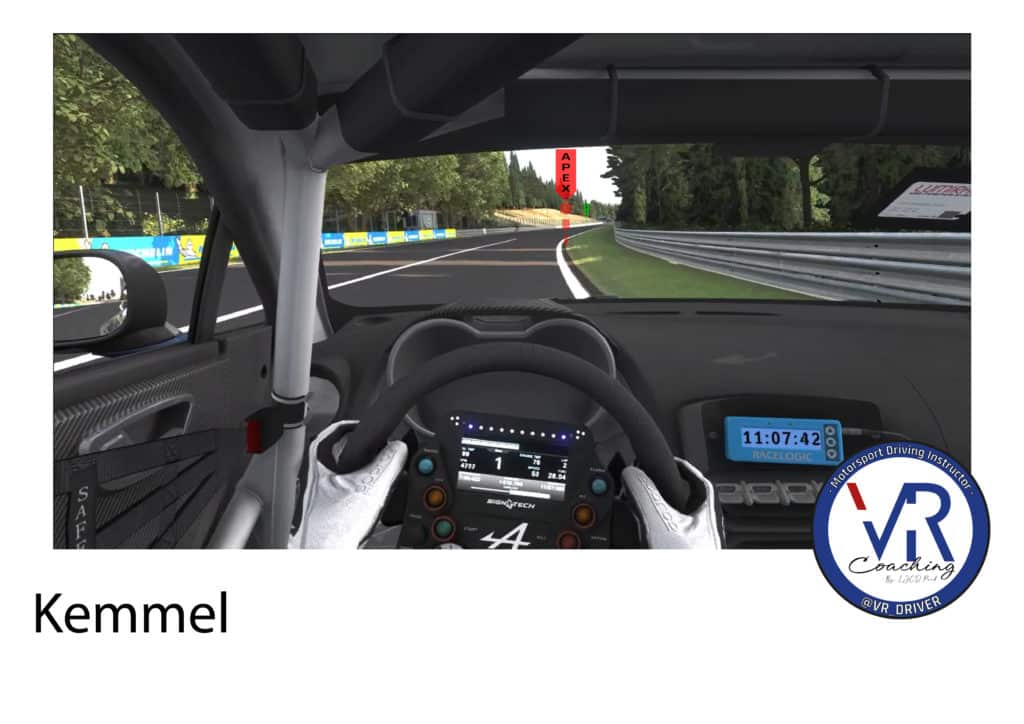
Stay at full throttle, shifting gently to the left of the track as far as the start of the Combes vibrators.
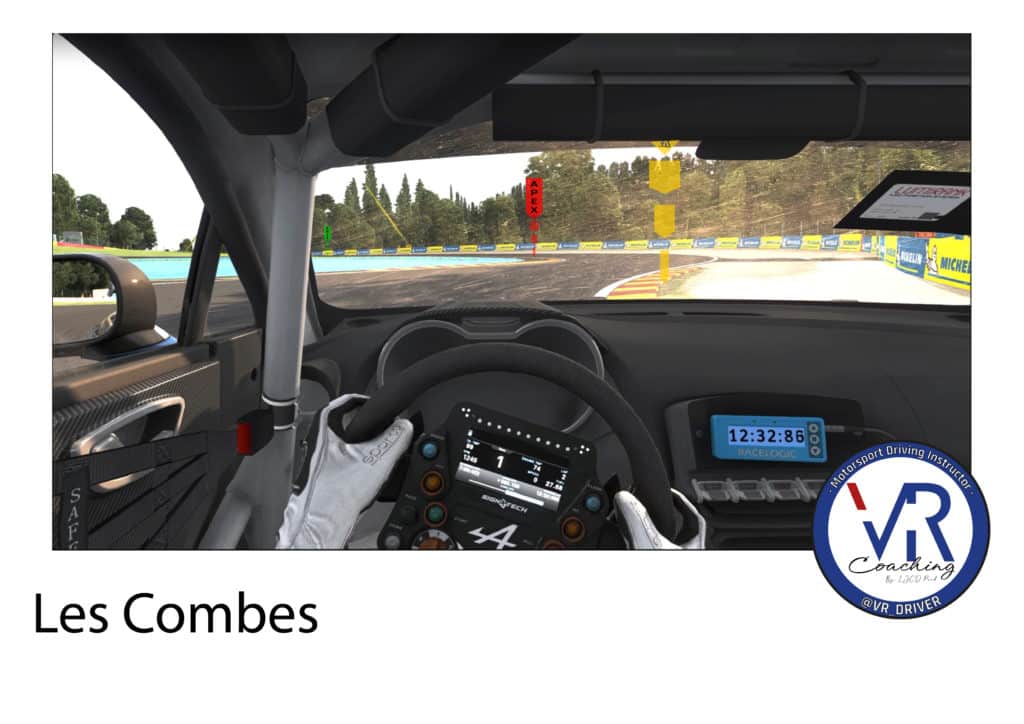
Turn 5: Watch out for the exit in Les Combes

Brake hard and use regressive braking to maintain speed and maximum front grip. The turning point is at the end of the vibrator and you aim for the middle of the vibrator on the right.
Depending on the vehicle, you may have to drive hard over this vibrator, but in our case it won’t be necessary.
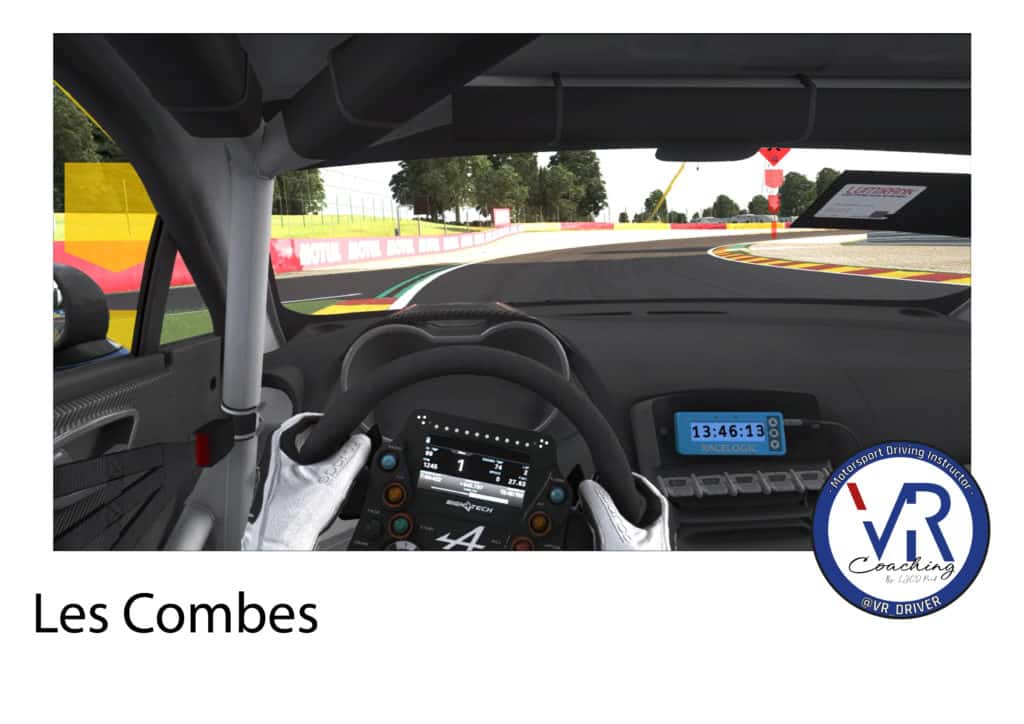
At the end of the right-hand vibrator, we turn left to aim for the chord point. Depending on the vehicle you choose, you may even be able to pass two wheels behind the left-hand vibrator. Again, in our Alpine today, we won’t need to do this.

Coming out of the left-hand bend, we stay in the middle of the track to take the next right down to Brussels. We then aim for the beginning of the left-hand vibrator.
The turning point is 3-4 metres before the end of the vibrator. Aim for the end of the green carpet behind the right-hand vibrator.
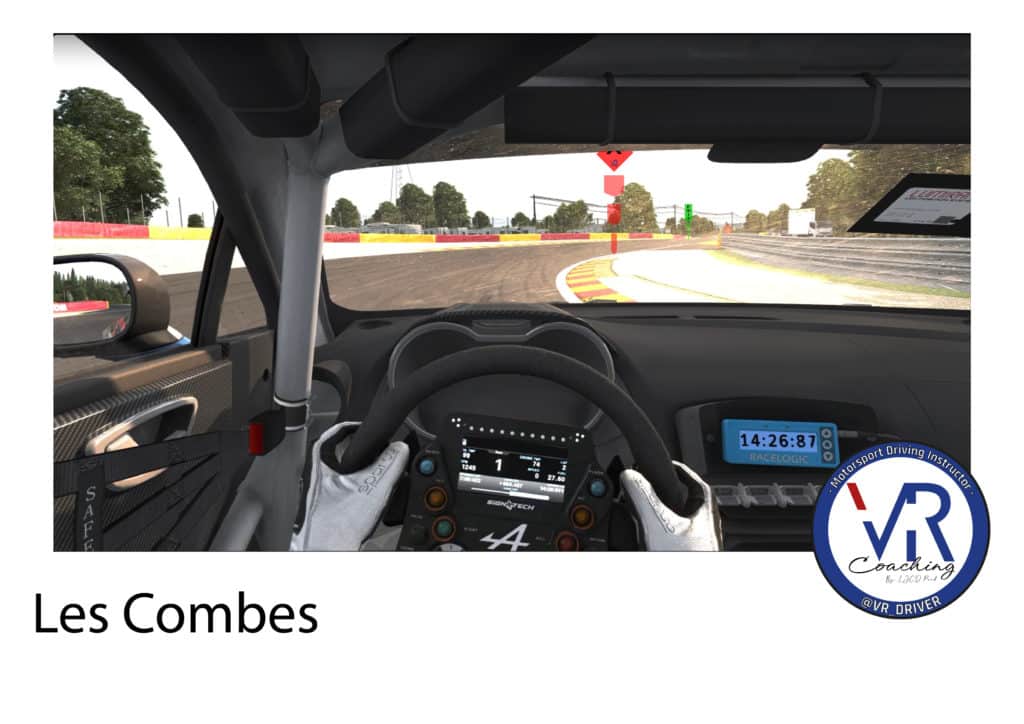
Once you’ve passed the rope point at the end of the green carpet on the right, you can aim for either the end of the vibrator on the left, or the second electricity pole if there’s traffic ahead.
Stage 6: Don’t block the wheels in Brussels

Follow the line down towards Brussels. Brake just after the 100m sign, taking care not to lock the wheels (the slope is treacherous).
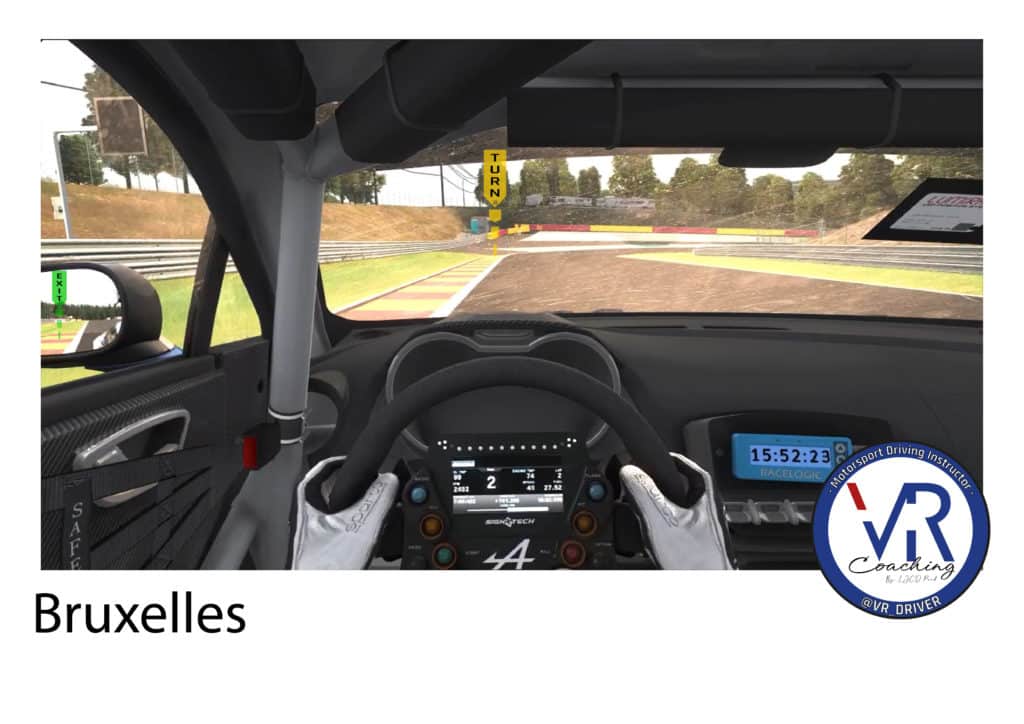
Let’s take a look at one of the three trajectories for this bend, the most educational one for practice.
At the end of the left-hand vibrator, we enter the bend to touch the first median chord.
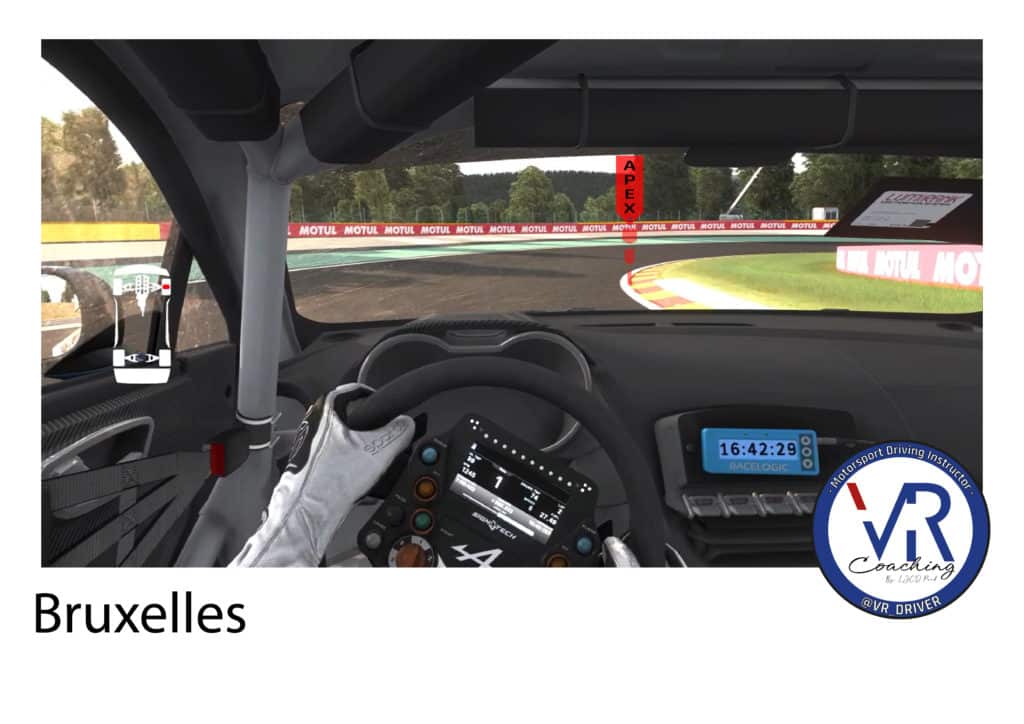
Once you’ve touched the apex, you follow the vibrator until you see the beginning of the vibrator on the left, at which point you widen the corner to get closer to the left of the track.
In the real world, there’s wire netting all the way to the right, and the turning point is marked by the last curator window in the netting.
Since the marker isn’t there, we’ll use the black panel which is in the right place.
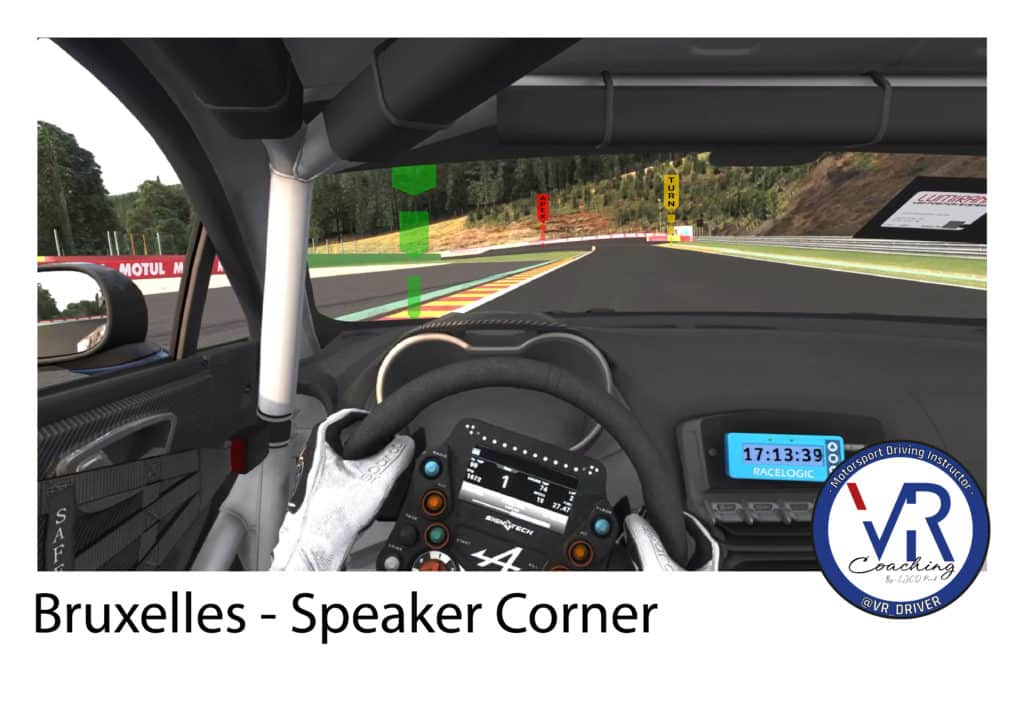
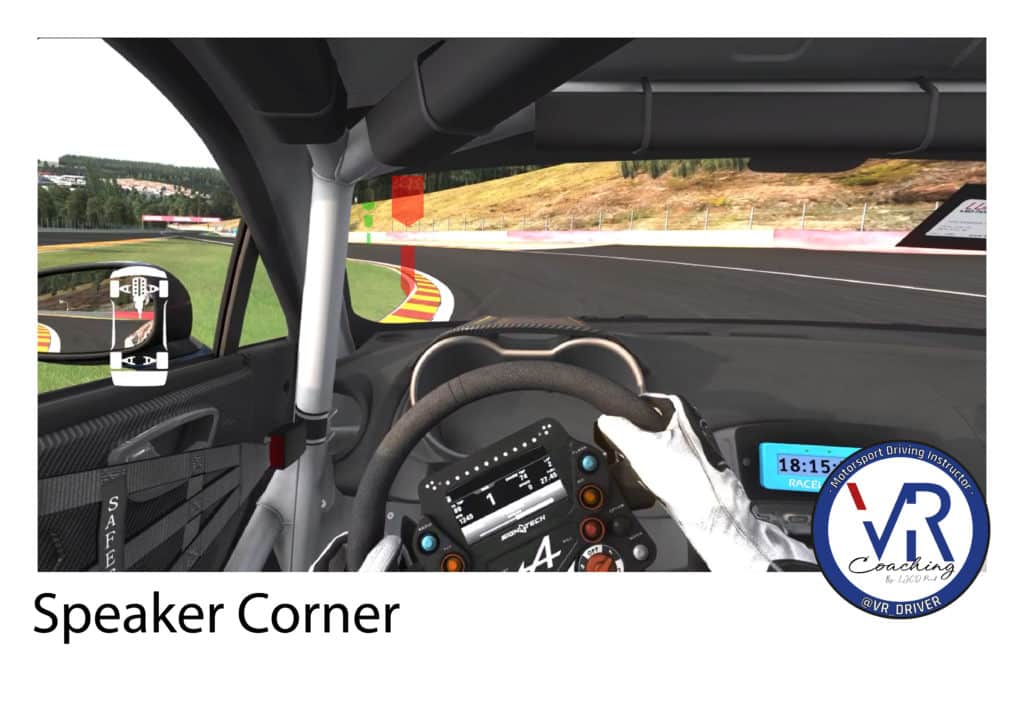
Stage 7: more work on the Speaker Corner exit
We return to the rope. In the real world, there’s a big red sausage all along the rope, and you have to aim for the end of this sausage.
In our case, we’ll just aim for the middle of the vibrator.
Keeping your steering wheel angle, the car should shift naturally to the right as you re-accelerate.
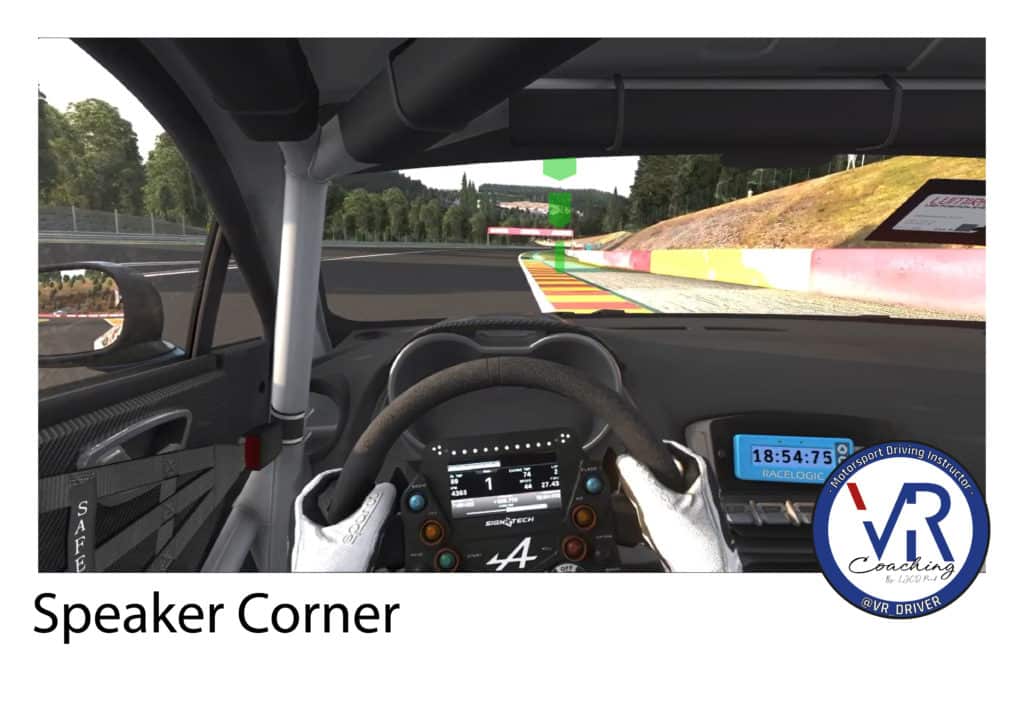
No difficulty here, just mash the throttle and stay to the right in preparation for the oncoming double left.
Stage 8: the double left
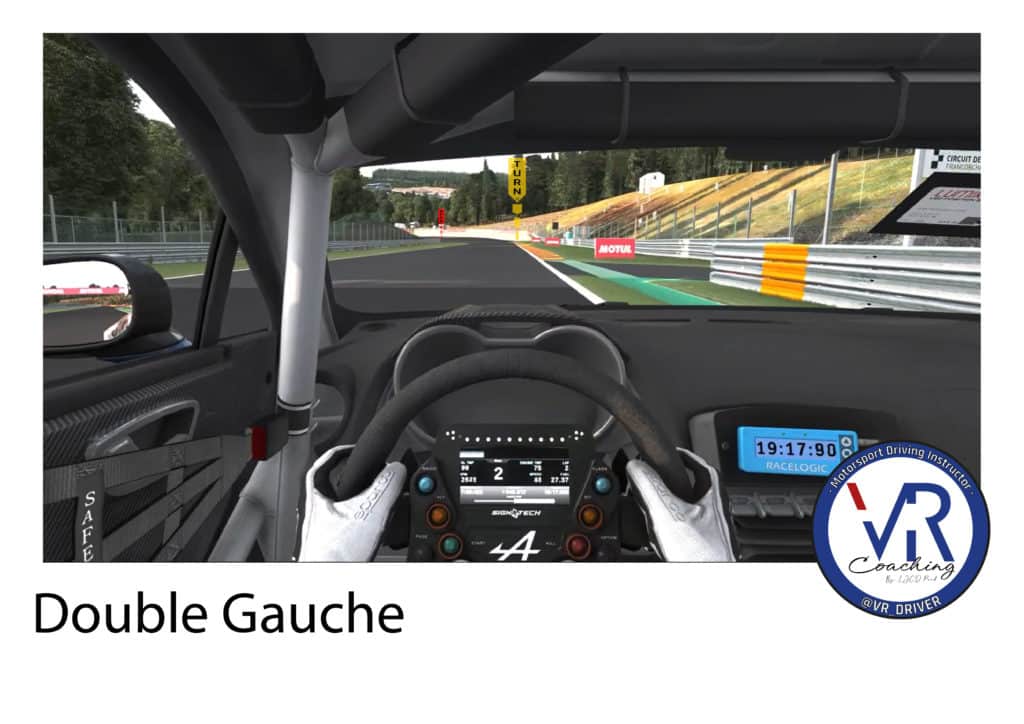
Here we turn right at the end of the vibrator and go to the left chord.
The chord point is in the middle of the vibrator. The aim of this double left is to do the combo in one go, keeping the same steering wheel angle.
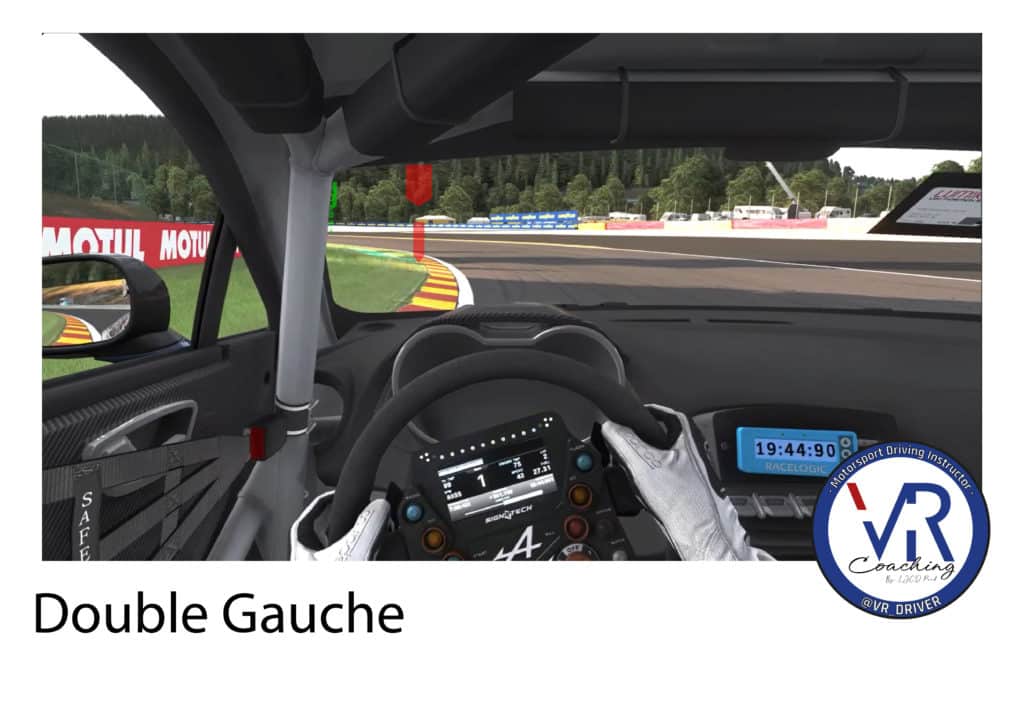
Once you’ve passed this first apex, keep the angle. The car will naturally shift to the right.
If the trajectory was good, the car will then tighten to the left. The exit point is located by aiming at the right-hand post of the gantry. This will take you to the end of the right-hand vibrator.
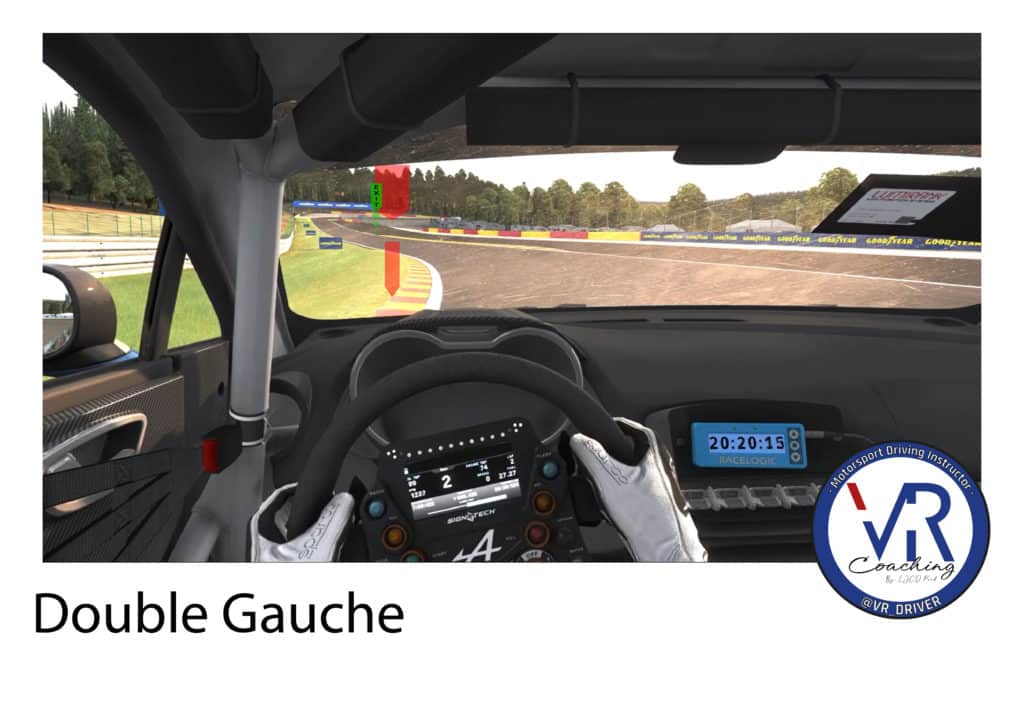
Stage 9: Beware of the S de Fagnes vibrators

As soon as you’ve reached the end of the right-hand vibrator, we head for the left-hand side of the track.
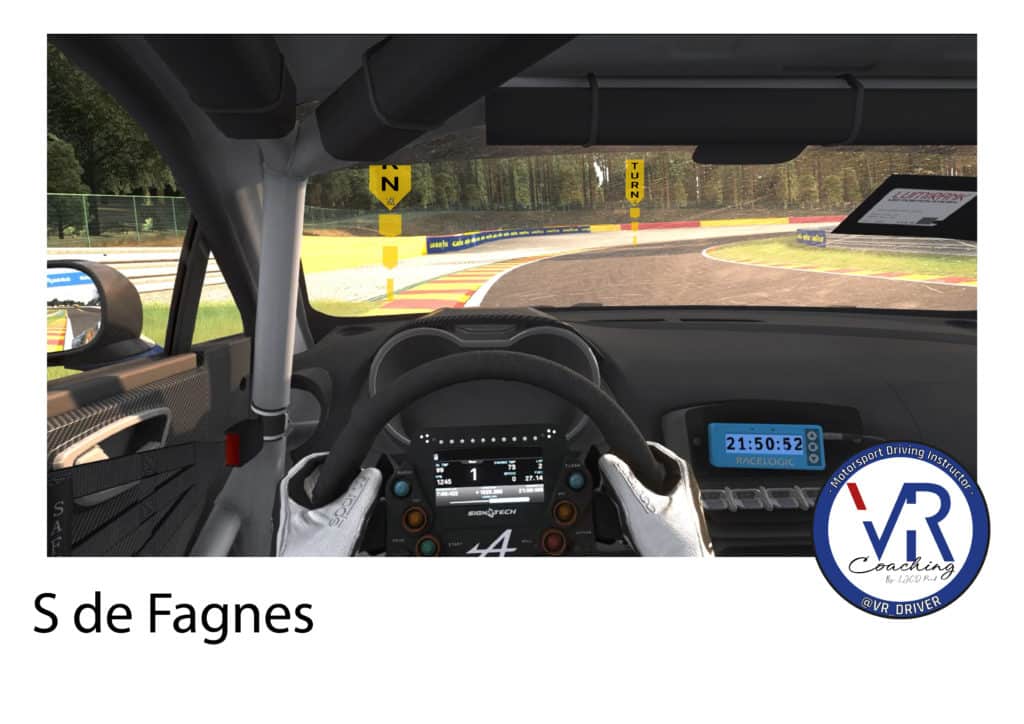
The turning point is marked by the beginning of the gravel trap on the left.
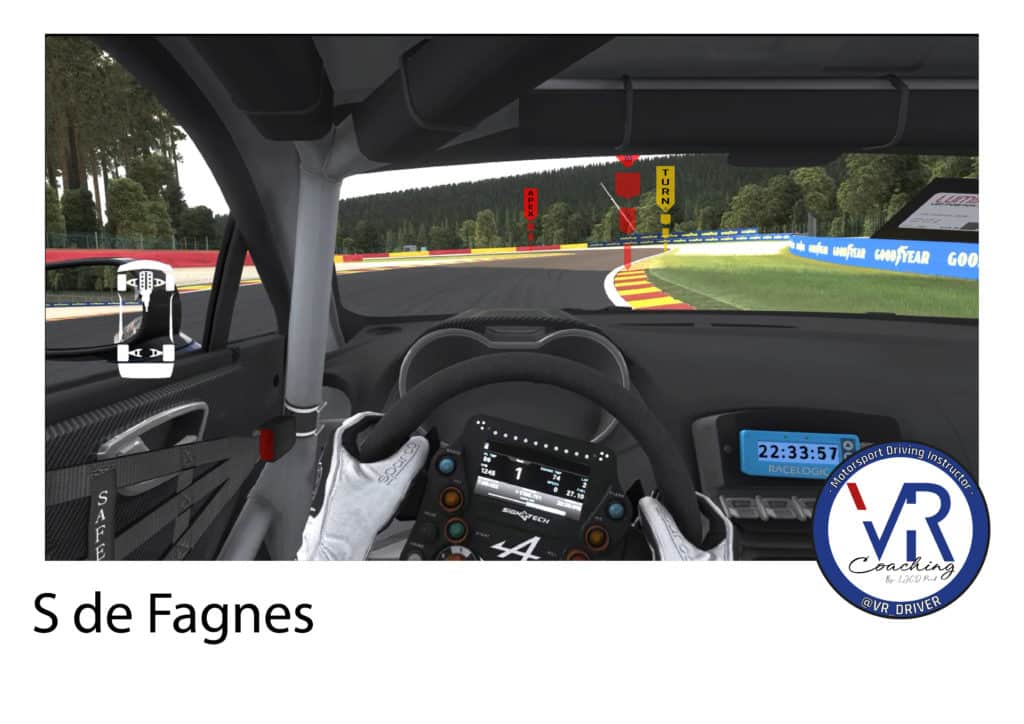
Follow the vibrator, but never climb over it. The chord point is located at the end of the vibrator on the right.
This chord point also serves as the turning point on the left.
In real life, there’s a manhole cover marking the chord point. But here you can identify it by the change of surface behind the vibrator. The junction between the two pavements is well located.
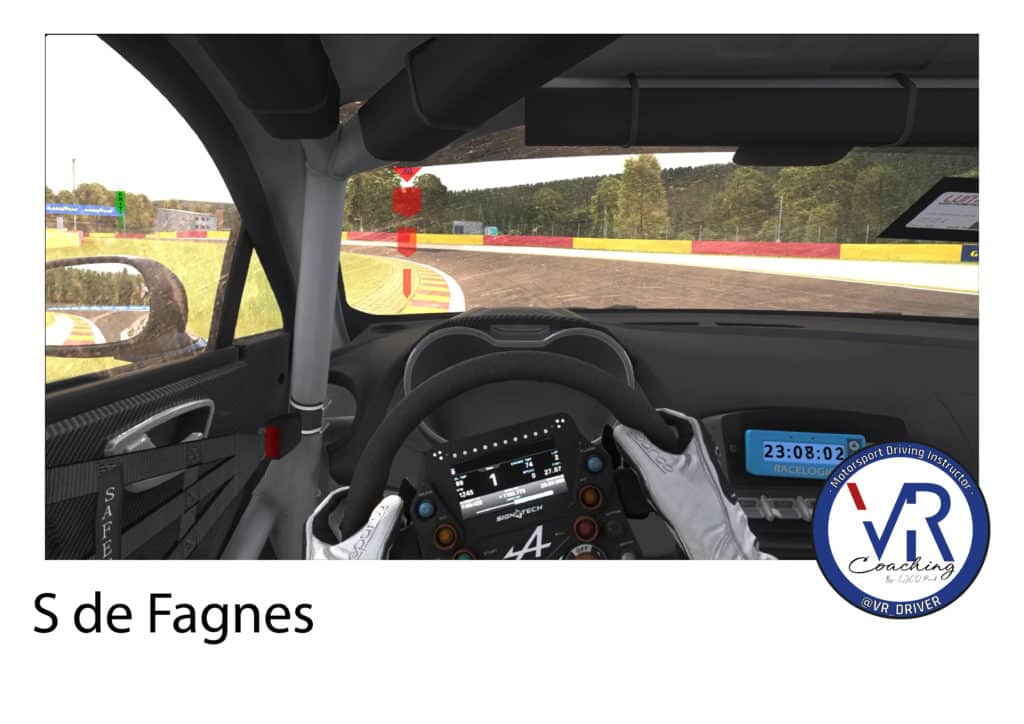
The exit point to aim for is the right-hand post of the gantry.
Watch out for the vibrator on the left – it’s downhill. Many can testify to its danger..

Once you’re out of the S de Fagnes, you’ll veer off to the left, aiming for the start of the vibrator.
Stage 10: full steam ahead into the Campus
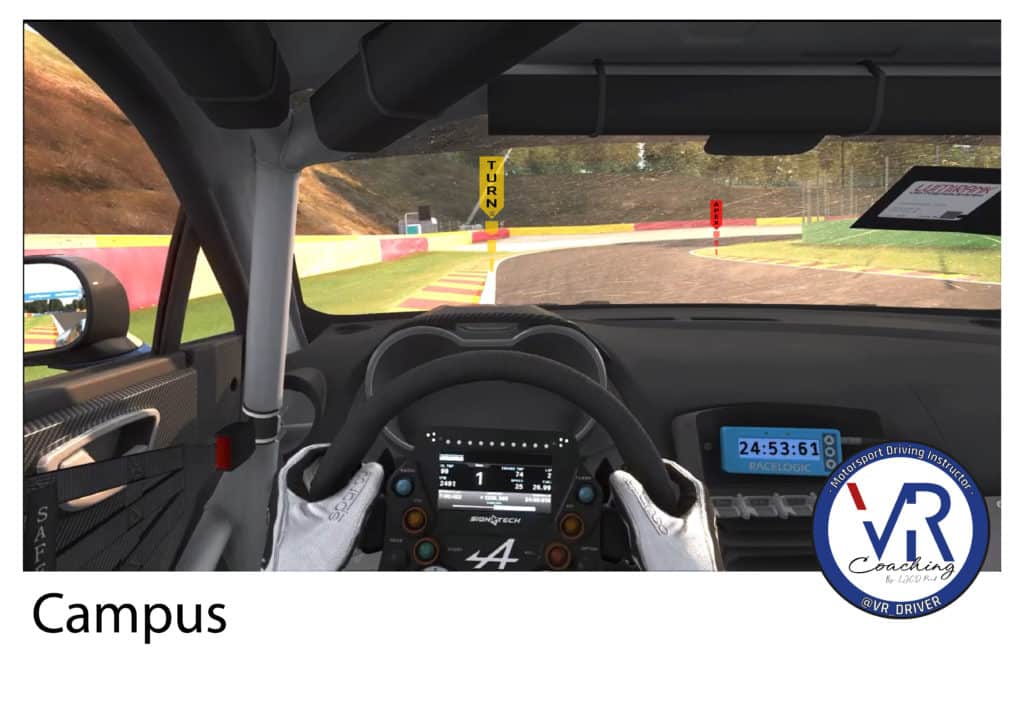
The Campus turning point is at the end of the vibrator on the left. Its chord point is very school-like, being in the middle of the right at 90°.
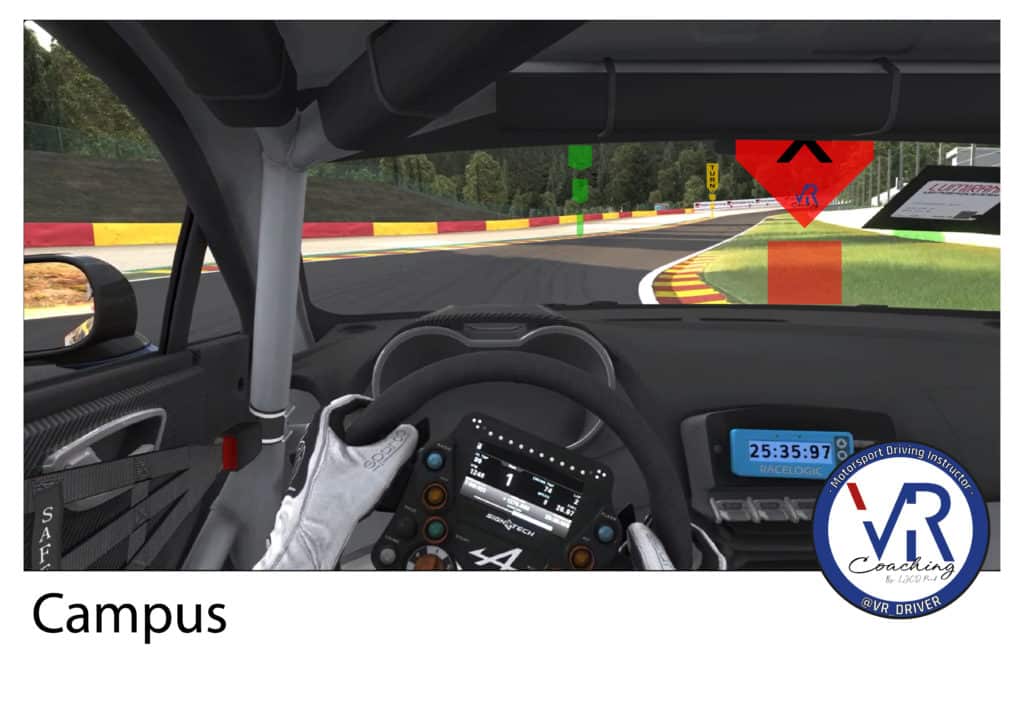
Now we move to the left. You can put two wheels on the vibrator, which is normally completely smooth, and move forward to the end of the vibrator.
Step 11: Floor it at the karting track
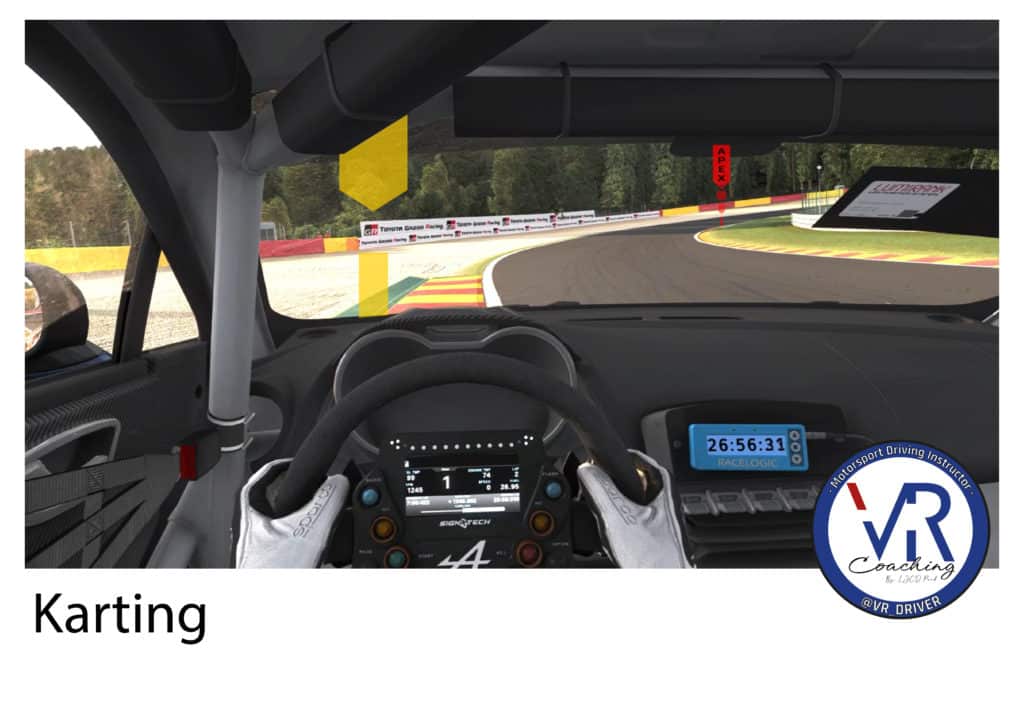
Now it’s time to turn right, aiming for the end of the second green carpet. In the real world, you can aim for the beacon supports that are there, choosing which support to use according to the car you have.
The exit point to aim for is the end of the gravel trap on the left. So widen out in that direction.
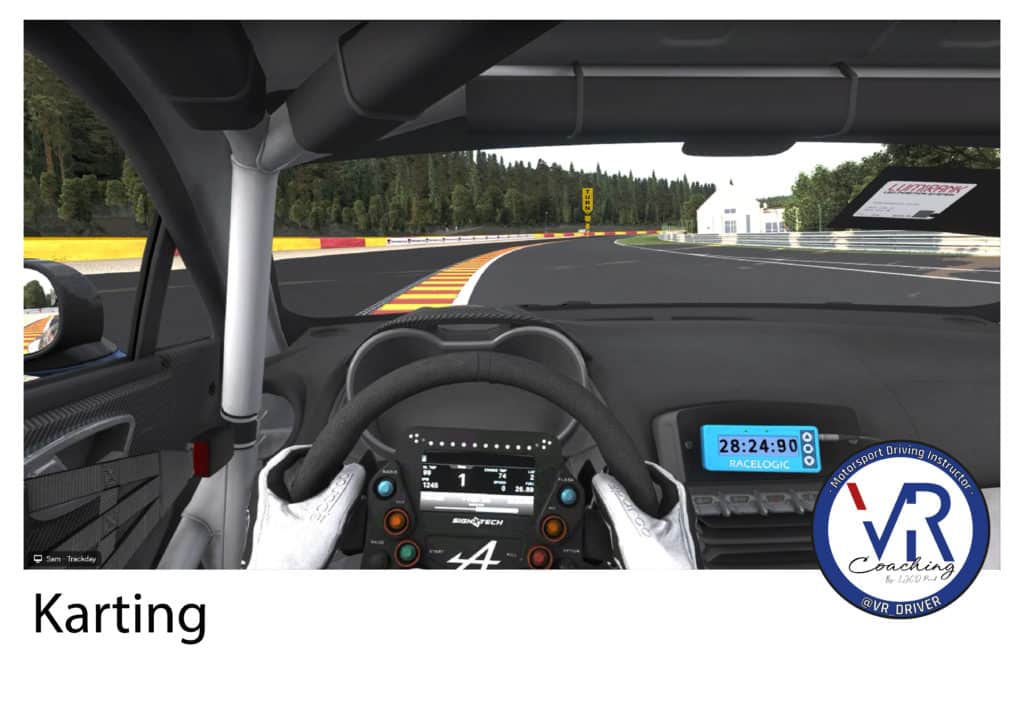
Don’t get on this vibrator. If you get on it without managing your throttle properly, you’ll simply go for a ride in the marshals’ gardens.
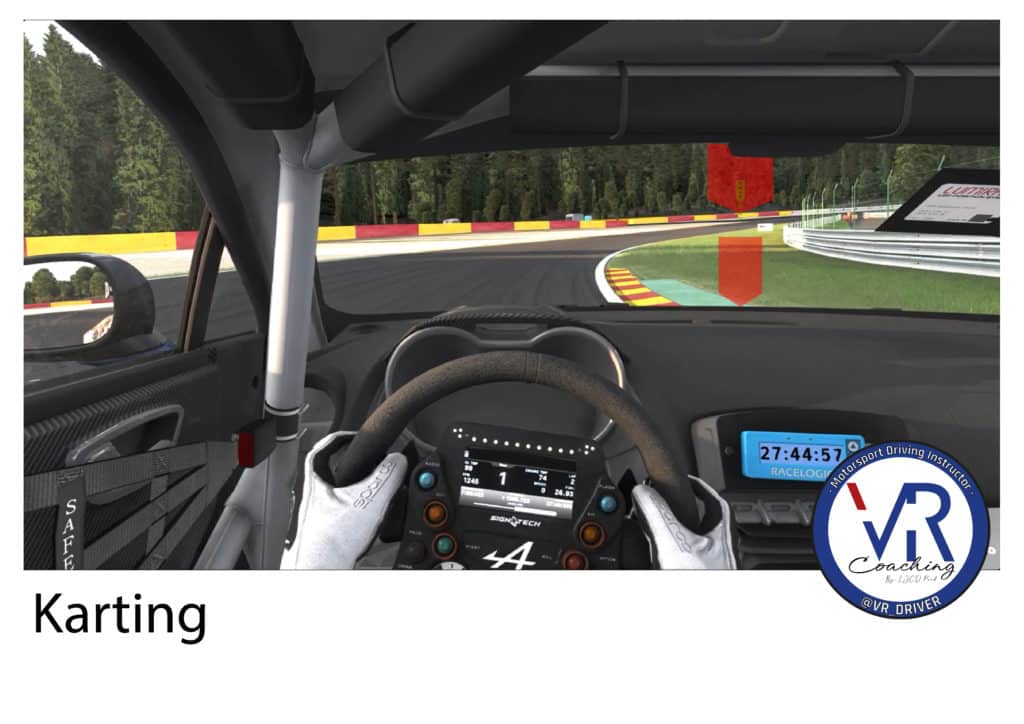
There’s normally a huge FIA fence here, for reasons you can imagine…
The turning point we’ll be aiming for together is the marshals’ booth on the left of the track.
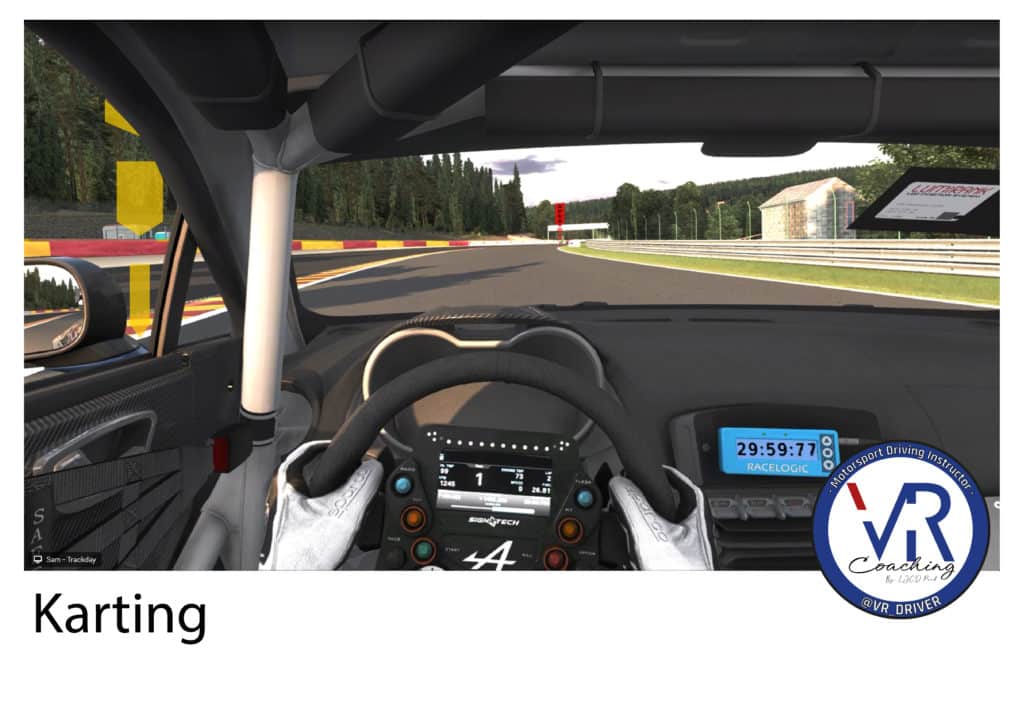
As soon as the booth passes in your lateral field of vision, we dive to the right. BUT, if you’ve entered your curve correctly and kept your steering wheel angle, the car should naturally go to the chord point without you needing to turn the wheel again.
Stage 12: Blanchimont
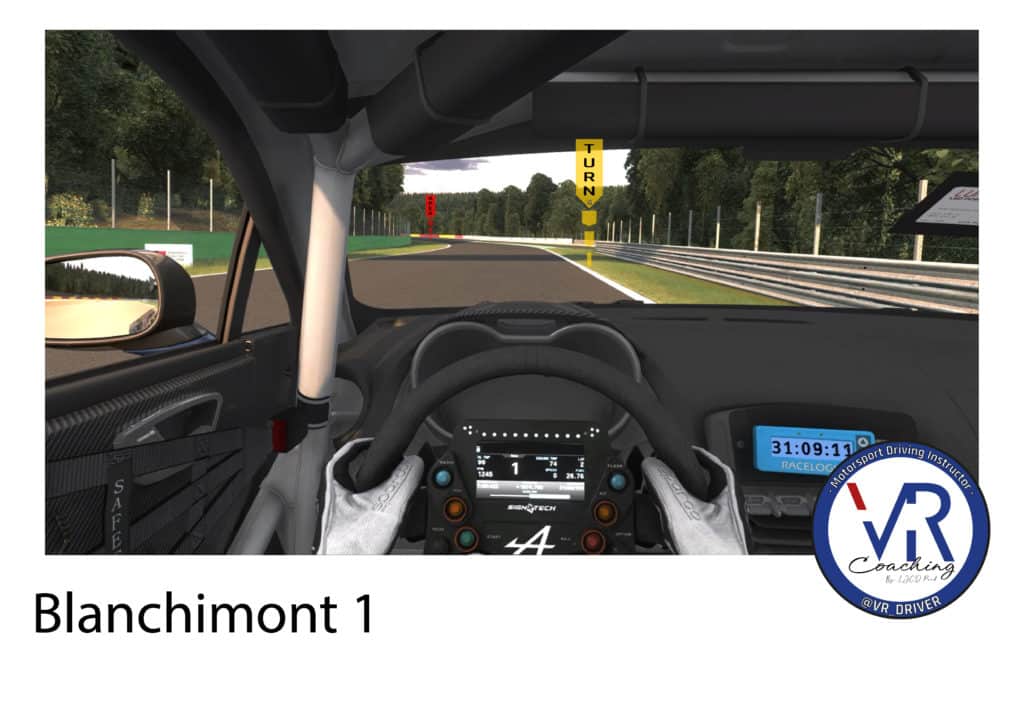
The turning point on the first left of Blanchimont is the end of the safety rail on the right. In real life, it’s the surveillance camera that serves as a landmark.
Aim for the middle of the runway, we’re not going to veer completely to the left. Why not? Because there’s more banking here than at the rope, so you can carry more speed.

You then move to the white line on the right, putting two wheels on the outside.
In the game, you’ll steer at the junction between the resin and the ground. And in real life, since the resin goes all the way to the end and you can’t look down when there’s traffic, you’ll rely on a post on the right which isn’t present in the game.
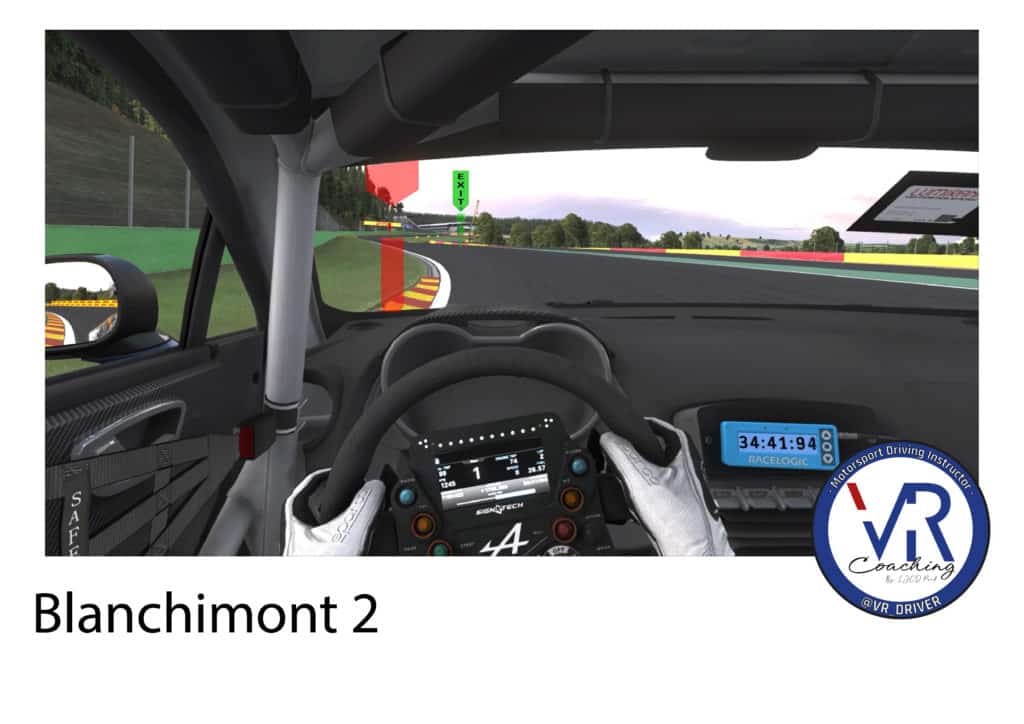
The rope point on Blanchimont’s second left varies from car to car. It’s either the middle of the left-hand vibrator, or the end of the left-hand vibrator.
But in reality, you don’t have time to think about the chord point here, because you’ve got so much speed that you’re more likely to pay attention to the turning point, enter the corner and aim straight for the exit point.
This exit point is the vibrator that can be seen in the distance on the right of the track under the gantry.
This reference point helps you stay on course. Because with speed, the car will understeer and drift onto the right-hand vibrator at the exit of the whitetail, and if you stay focused on this vibrator, you’ll end up in the tub. So you have to look further ahead!
Oh yes, and if you let off the gas here, expect to say hello to the wall on the left…

The vibrator on the right has 15cm-high steps (!!) If you go full throttle on it, you’ll end up outside. So you’ll have to manage the throttle to avoid being ejected.
Stage 13: the Bus Stop
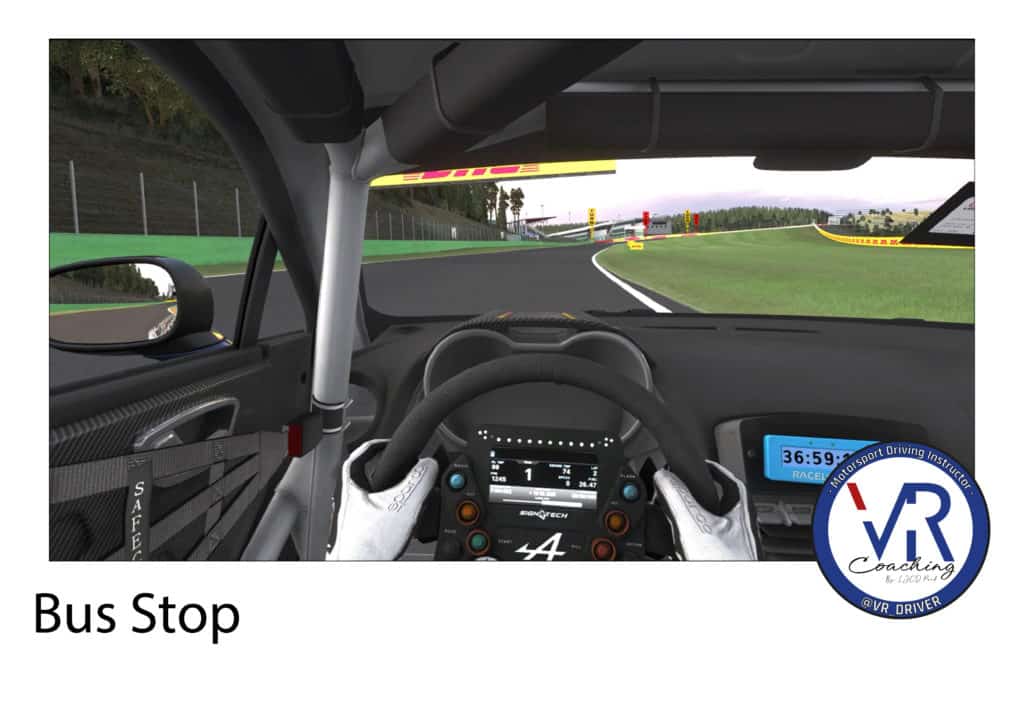
Move to the left to get into the braking line. We’re going to prepare for the bus stop, and this is where I’m going to ask for your full attention. You can gain a REAL second per lap in this sequence alone.
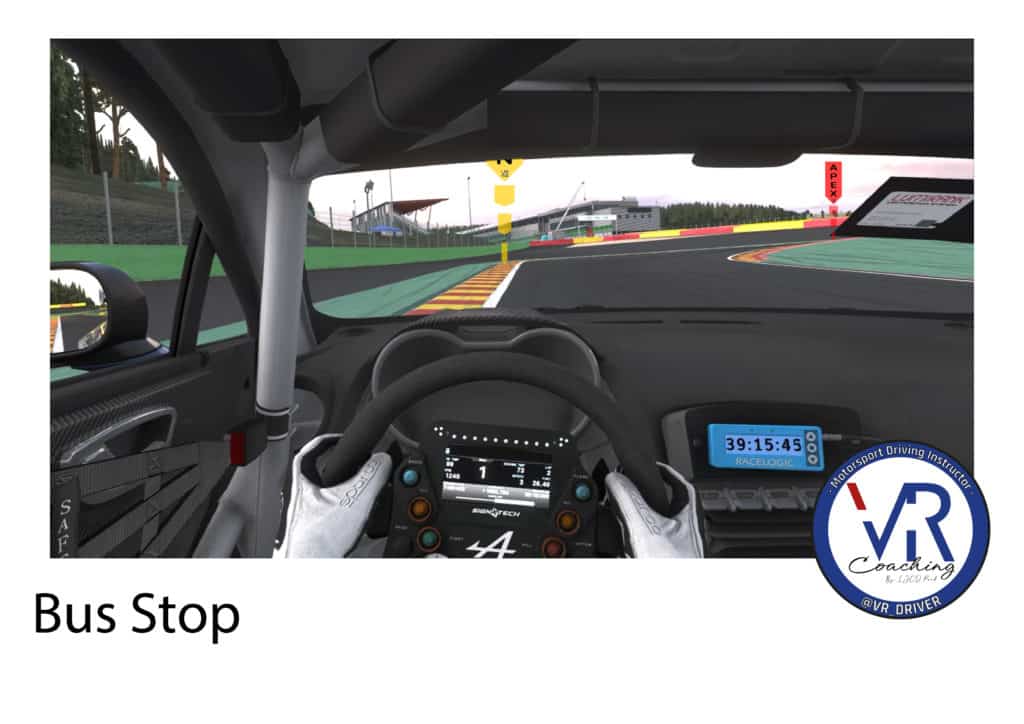
I’m going to ask you to do your best, and turn as late as possible. In the game, the landmark you need is the post on the fence, or the end of the gutter on the ground (which in real life doesn’t stop). And in real life, it’s a red photographic window in the fence.
Don’t point the camera beforehand. I know, you probably want to get into the bend sooner, but I assure you, you’ll save a lot (a lot) of time by being more patient.
You’ve turned late, that’s good! Position yourself parallel to the vibrator at the right-hand rope and follow the racing line to the right.
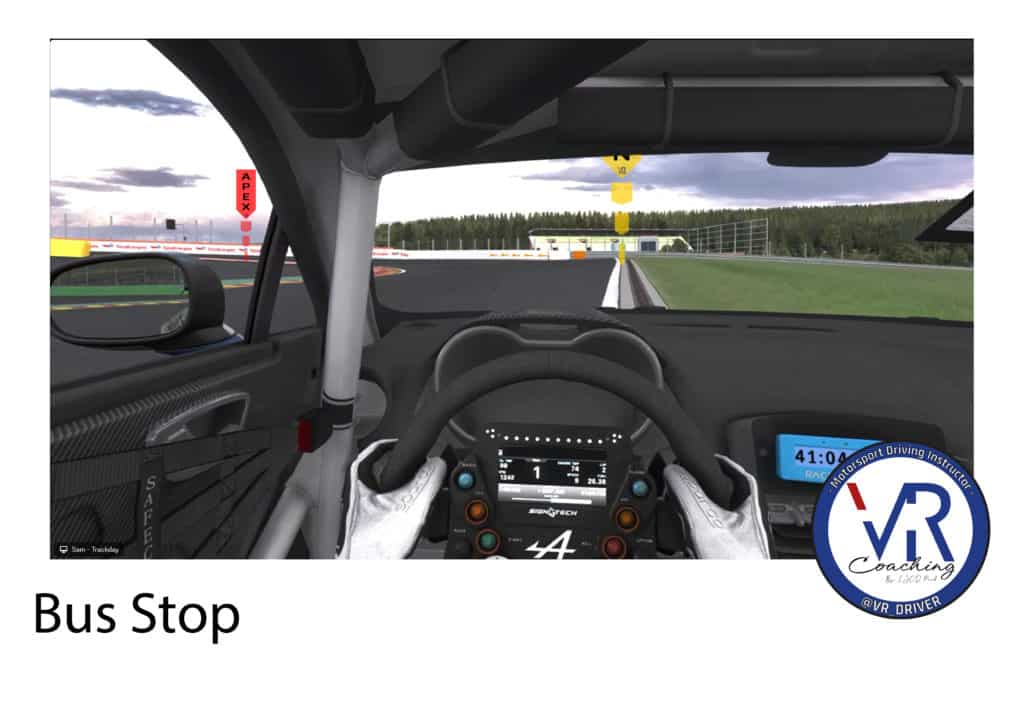
Can you see the red pin towards the Pit entrance? Stay RIGHT of this pin. There’s no precise turning point to give for the oncoming left. In fact, with speed, as soon as you’re to the right of the pin and your wheels are straight, that’s the signal to enter the left.

The left-hand chord point is in the middle of the vibrator, and you can use the ground line to aim for it. But this chord point is very much conditioned by the exit point you’re going to aim for. I’d ask you to aim for the left-hand gantry post to get out of the Bus Stop as quickly as possible.
Force yourself to follow this trajectory, and you’ll see that the speed in the straight that follows will be much more interesting!
Take time to master the school trajectory
I hope this first guide has been as useful to you as it has been to me! I’d be delighted to hear any suggestions you may have for improving the format, so that you can learn as much as possible from it.
Take the time to master this school trajectory, and later, if you show that you’ve done your homework, we’ll be able to show you lots of other ways to save time on the track! See you in the comments to talk about it together 😉
Want to learn how to DRIVE a racing car with SimRacing? Learn the art of piloting with a real BPJEPS qualified track instructor. Mastery of grip, trajectories, track markers, braking, weight transfers… These coachings are the first to offer an approach to simracing as if you were on a real track!