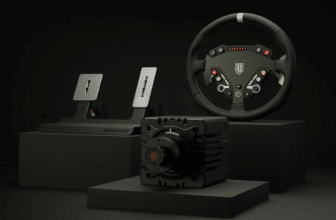
Today, it’s time to test the Simagic P500 pedalboard. The latest offering from the Chinese brand, this entry-level model is priced from €200 upwards. So, what can we expect? The whole package! Load Cell and magnetic sensors, metal structure and, above all, optional haptic motors to let us feel ABS, TC or loss of grip triggers, for example. So, after 3 weeks of daily riding, what’s our verdict on this inexpensive pedalset model made in Simagic? I’ll give you my detailed opinion in this test!
The price of the Simagic P500
Simagic P500 technical specifications
| Compatibility | PC. |
| Pedals | 2 pedals (accelerator-brake), Optional clutch. |
| Gas pedal | Spring-loaded, Magnetic sensor, 12-bit resolution (4096 dots). |
| Brake | Spring and rubber-applied, Load Cell (100Kg max) and magnetic sensors, 12-bit resolution (4096 points). |
| Clutch (optional) | Spring-applied, Magnetic sensor, 12-bit resolution (4096 points). |
| Vibration (optional) | P-HPR haptic motors P-HPR Neo haptic motors P-HPS power supply |
| Floor-mounted and/or chassis-mounted | Rubber pads for floor mounting. 4 MX screw holes for chassis mounting. Wall bracket (free) |
| Connections | USB-B for connection to your PC, CAN socket for direct connection to the Simagic ecosystem, Power supply for haptic feedback. |
Design and ergonomics
In the box
- Simagic P500 2-pedal pedal board.
- USB-B USB-A cable.
- DIN cable
- Screws and tools for adjustment and installation on chassis.
- Scratch and cable management clips.
- User manual (English/Chinese).


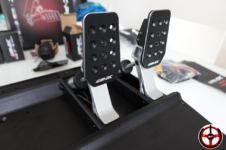
Upon unpacking, the beast is revealed. A rather massive mounting plate consisting of a plastic front section with an aluminum footrest, a 4mm-thick pedal support, also in aluminum, and full aluminum pedals on both arms and plates. My first impression is that the Chinese aren’t kidding. For a pedalset costing less than €200, we’re used to the all-plastic, toy-like look. Here, on the contrary, everything suggests that we’re dealing with a sturdy, reliable pedalset.
Speaking of looks, it’s clear that Simagic has taken its inspiration from the Logitech G-Pro pedals design, but has added its own ideas and evolutions. All in all, it’s quite a success, but it remains to be seen how practical it will be on the race track during testing.

Looking a little closer at the pedals, I quickly notice how smoothly they move, thanks to ball bearings. The brake can also be fitted with an eraser to create a two-stage movement. But I’ll tell you more about this in the settings section of the test.
What do we have here in the way of sensors?
Let’s move on to the sensors installed on the pedalset. The pedals are all equipped with magnetic sensors (which measure the position and angle of the pedal) with 12-bit resolution. But the brake is also equipped with a Load Cell sensor (which measures the force exerted on the pedal) with a capacity of 100Kg. To date, this is the only pedalset in its price range to offer both types of sensor on one brake.
You can switch from magnetic to load cell sensors with a simple click via the SimPro Manager software. But why on earth put two sensors on the brake? Well, let’s just say that the magnetic sensor will come in handy for players who don’t have a frame to mount their pedalset on. With a Load Cell, despite the anti-slip pads on the underside of the bracket, the pedals would go for a walk every time they braked.
What’s more, for those who ride with their pedalboard on the desk, Simagic has come up with the excellent idea of offering a free optional wall mount! Thepedalset is then braced against the wall so that it doesn’t slide or tip backwards when using the Load Cell sensor!
Mounting the pedalset and its options
OK, let’s move on to assembly. Yes, the pedalset arrives in kit form. Well, don’t panic, there’s really not that much to do:
- Remove the footrest (4 screws)
- Pass the pedal cables through their respective holes and connect them to the connection box.
- Position the pedals, choosing their spacing (2 screws/pedal).
- Re-install footrest.


If you want to place the P500 on an aluminum profile, you will have to go through the 4 screw holes present on the aluminum plate of the support. A word of advice: install the plate on the chassis BEFORE permanently fixing the pedals and replacing the footrest otherwise these holes will no longer be accessible because they are hidden by the pedals.
If you have purchased one or more optional haptic motors, remember to install them on the pedals before mounting them on the stand. Otherwise, you’ll simply have to repeat the whole operation.
For our part, we also received the clutch pedal option, supplied with a total of 3 springs to adjust its hardness. The movement of the pedal is linear (no system to simulate the slip point) and is identical in all respects to the construction of the accelerator pedal.
Setting up the Simagic P500
Among the physical settings of the Simagic pedalboard, there are a few good ideas, but also a few areas for improvement that I would have liked to have seen.


First of all, we start with the placement of the pedals across the width. To do this, you have 12 screw threads spaced 2.2cm apart. Once you’ve got your pedal, you’ll be able to juggle the width a little more, thanks to 3 rows of perforated plates spaced 1.5cm apart, and 4 rows of perforated plates spaced 1.5cm apart.
Next comes pad inclination adjustment, which can be set at 4 different angles to suit your riding position.
And finally, the pedal hardness adjustment. 4 springs in addition to those already fitted are available to adjust hardness. And for the brake, you can also choose to add a rubber that will create a 2-step feeling by hardening the second half of the movement. I recommend you use these rubbers with the brown and XXX springs to avoid too much difference between the 2 stages.
Available spring hardnesses (measured on the pedal plate):
- Green: 3Kg
- Yellow: 4Kg
- Red: 8Kg
- Blue: 9Kg
- Brown: 15Kg
- Gum brown: 20Kg
That concludes the physical settings section. There’s no front/rear adjustment of the pedals in relation to each other, but I’m not surprised to find that on an entry-level pedalboard. My only regret is the impossibility of adjusting the length of the pedal travel. I reassure myself by telling myself that, in any case, in a few months’ time, there will be enthusiasts to create kits for this purpose.
Setting up the SimPro Manager software
Now that the P500 is in place and you’ve set up its pedals, we can move on to the SimPro Manager software. The first thing to do is to calibrate your pedals to ensure that the input is correctly measured from the beginning to the end of the movement. Then we’ll create dead zones at the beginning and end of each movement (2% is enough) to avoid finding yourself, for example, with a bit of brake dragging on your straights if you tend to leave your foot on the pedal throughout your runs.
Speaking of the brake, this is also where you’ll be able to choose between the magnetic sensor, recommended if your pedalset is just sitting under a table. Or the Load Cell sensor, much more interesting in terms of performance and realism, but which will require either fixing the P500 to a frame or having the wall mount to prevent the pedalset from flying off with each brake stroke.
Once you’ve done that, I suggest you spend some time testing the different input curves offered by the brand. On the brake, for example, changing the capture curve can give you a real advantage in managing degressive braking. My only regret is that, at the moment I’m testing the pedalset, you can’t create 100% customized curves. Hopefully, this will come in a future update.
You can then save your settings in profiles that can be associated with your various games, and which will load automatically when you switch from one simu to another.
Comfort and feel on the Simagic P500

Now it’s time to hit the track! For the test, I used the P500 on a SimLab P1X-Pro chassis on a daily basis. And the first impression was rather disconcerting. I had, I must confess, lost the habit of using soft brake pedals, and it took me a few days to get my bearings again. Once I did, here’s what I thought.
A brake that does its job
First of all, the brake is precise. What I mean by this is that if I send 80% of force into its face and maintain this pressure, it won’t release the pressure on its own and distort my braking. Don’t laugh, it happens to some top-of-the-range pedalsets (isn’t it P1000….)!
On the other hand, I think using a 100Kg Load Cell was clearly overkill. Because even with the hardest spring and the use of a rubber to harden the brake, it’s almost impossible to put more than 20Kg of pressure on the pad and still get an interesting feel. As a joke, I’ve gone up to 30Kg, but then you lose all feeling, and given the long pedal travel, you end up with an angle on the brake pad that will start to make your foot slip, even in shoes.
Big feet, big… pedal pad?
Another detail to consider is the height of the pedal pads. Even mounted to their maximum, they’re pretty small, and if your feet are bigger than 41-42, they’re just right, especially for the brake. Personally, I’m a size 43 and I found myself hitting the brake more with the middle of my foot than the top, which wasn’t very practical. In the end, I resigned myself to stop hitting the brakes, after all, the target audience for this pedalset isn’t generally into heavy braking.
Another point to emphasize is that since I had to put the brake pads as high as possible on the gas pedal and brake, heel-toeing wasn’t the easiest thing to do either. I had to make a big ankle movement to reach the gas pedal with the heel and/or the side of the foot, which made my precision on the brake with the top of the foot less stable.
However, for Flo, who rides a 35, it was literally heaven!
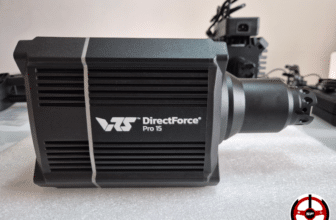
Trying out the P-HPR Neo haptic feedback on the Simagic pedalset
During this test, I also installed the P-HPR Neo haptic motors. These are optional motors that are placed on the back of the pedals to add vibration/shock sensations in various situations. For example, you can get a feeling when the ABS is triggered or the wheels lock. Or add more fanciful information (because it’s not actually transmitted through the pedals) but very informative, such as traction control activation, rpm increase, speed, etc.


These haptic motors can be adjusted directly from SimPro Manager. You select the effects you want to use, then for each of them you set the intensity of the couplings and their frequency (how many strokes/second will be sent).
I’m not going to go into all the features of the P-HPR Neo today, as I’m preparing a comparison between this model and the other P-HPR model so that you can understand the differences between the two.
What I can say is that I was pleasantly surprised by these little engines. It’s a far cry from the feeling offered by simple vibration motors; and for the price, it’s a very interesting addition if you want more immersion and driving aids.
But there’s one detail to bear in mind! When you buy P-HPR Neo (or simple P-HPR) motors, it’s imperative that you buy a P-APS power supply that connects to the pedalset. Without it, your haptic feedback won’t work.
A final word on comfort and pleasure of use?
To conclude this section, I must confess that for an entry-level pedalboard, the Simagic P500 pleasantly surprised me. Admittedly, it’s limited in terms of brake hardness and general settings, but in this price range, it’s clearly the best I’ve seen. I even enjoyed riding it for 3 weeks, which was a great success.
My Simagic P500 review