Today I’d like to introduce you to Simagic SimPro. This software replaces the iconic Alpha Manager for adjusting the force feedback of Simagic bases. As usual, I won’t give you ready-made settings, as that would be counterproductive. Instead, we’ll go through each SimPro setting together, so that you fully understand how it works.
The ultimategoal at the end of the article will be to create YOUR ideal force feedback. The one that gives you precisely all the information you need to perform on the track. All the while, of course, having maximum fun.
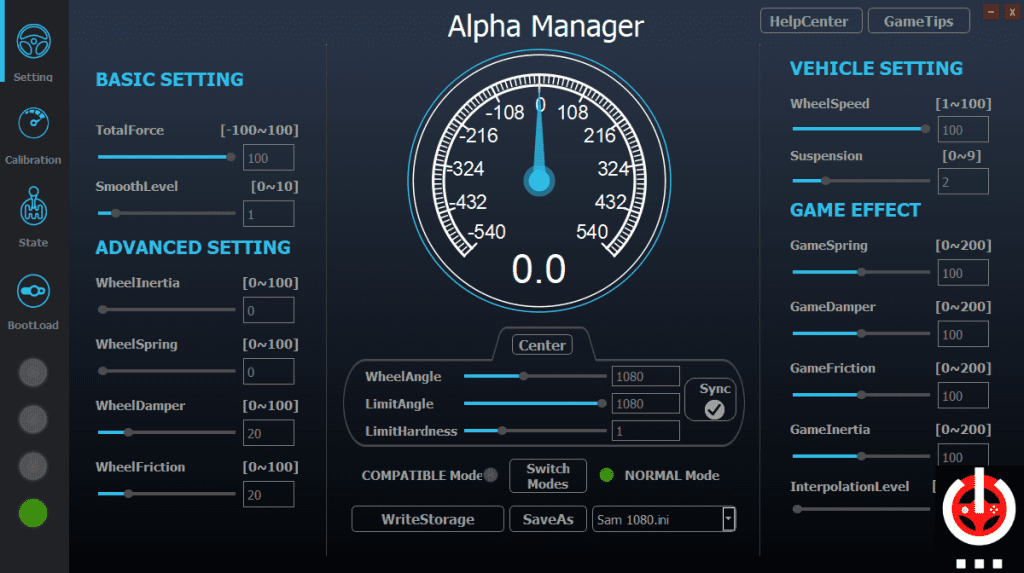
Simagic Alpha Manager vs SimPro
Changing software takes time and costs a brand a lot of money. So I’m delighted to see that Simagic has made a real effort to make its ecosystem even easier to use for its customers. Where the old Alpha Manager was rather austere, and sometimes blurred, the new SimPro is really focused on clarity and simplicity.
In fact, it was an almost obligatory shift for the brand! With its rapidly expanding ecosystem and increasingly tough competition, Simagic couldn’t afford to rest on its laurels.
Where to set the force feedback?
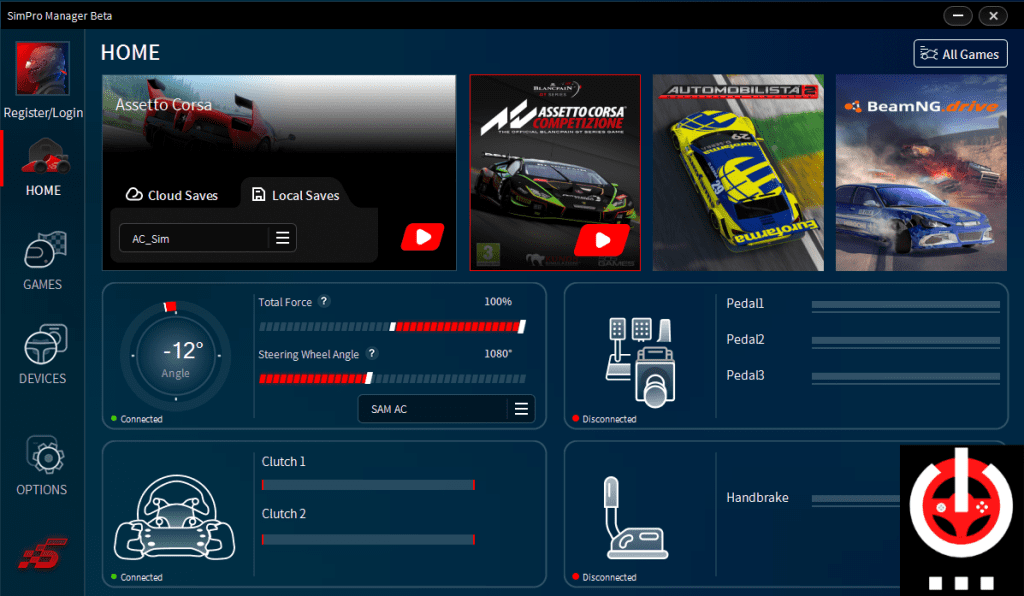
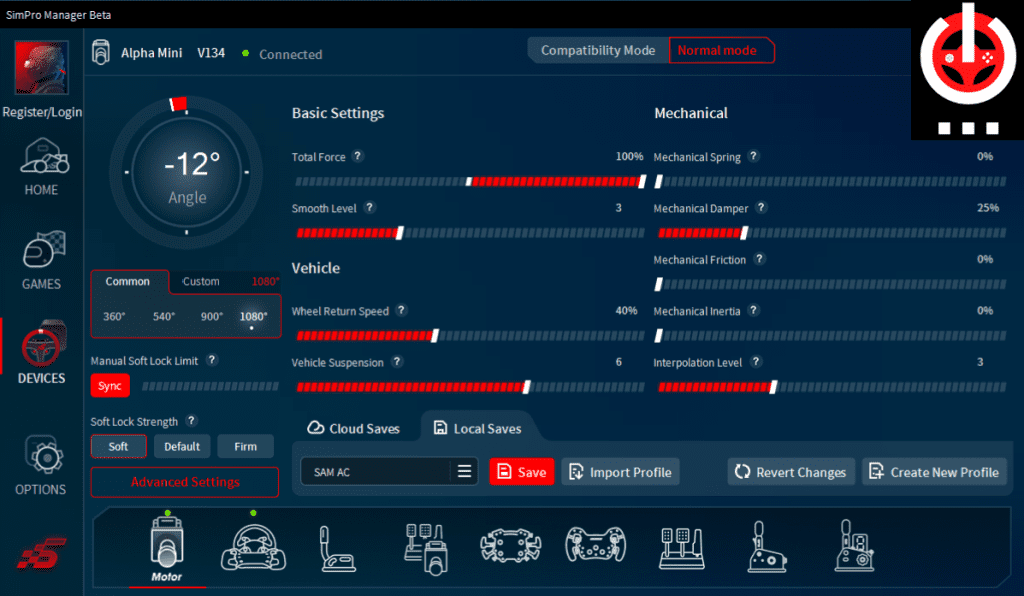
I’ll let you discover all the Simagic SimPro pages for yourself, but what’s important to us today is to make force feedback settings. So, let’s go to the Devices tab on the left of the screen. Once you’ve clicked on it, the Motor page appears. This is where you’ll find the FFB settings, which is exactly what we’re interested in.
To make things as simple as possible, we’ll divide the SimPro console into 3 parts:
- On the left, the steering angle and stop settings
- In the center , basic force feedback settings
- And on the right, the mechanical effects applied by the software
On the left of the Simagic SimPro console
Angle Common or Custom
- What does it mean? Steering angle
- Options: 90 to 2520°
This is probably the simplest setting to understand. Depending on the angle you enter here, you’ll be able to do more or less wheel turns. In the Common tab, these are the most common settings. On the custom tab, you can drag a slider to define the precise angle you want to achieve. But you can also enter the angle you want directly using the numbers on your keyboard.
Manual Soft Lock Limit
- What’s this? Define a limit point in the steering angle
- Options: Synchronized – Customized
You can choose whether or not to synchronize the steering angle and the angle at which the base will stop your rotation.
Let’s take an example. Let’s say you’re on Assetto Corsa without Content Manager. You can set your wheel to 1080°, but if you’re on a vehicle with a lower steering angle, in certain scenarios your steering wheel won ‘t lock. It’s very detrimental to immersion! (But then again, if you’re playing AC without Content Manager, you’re missing out on the best part of the game…)
So, by deactivating the synchronization button, you’ll be able to set the steering angle to 1080° and then the Limit Angle according to the type of vehicle you’re using.
Stop Lock Strenght
- What’s Stop Lock Strenght? How hard you want the steering shaft to lock when you’ve reached the limit.
- Options: Soft – Default – Firm
Depending on the mode you choose, you’ll have more or less stiffness when you reach the steering angle stop. Try all three (Soft, Default, Firm) to find the effect that feels most natural to you.
Settings in the center of the screen
In the center of the Simagic SimPro display are the settings that will influence the behavior of the base itself.
Total Force
- What’s Total Force? Maximum torque sent by the base motor
- Options : -100 à 100
This is the maximum power your Simagic base will deliver. For example, if you have an Alpha Mini base that can send 10Nm of torque and you set this parameter to 100%, all 10Nm of torque will be used. The setting is proportional to power. Set to 50% on an Alpha Mini, you’ll get 5Nm of torque delivered.
You’re going to say “That’s all very well Sam, but why can we go into the negatives then?”
Well, because some games send a reverse force feedback signal. That is, they will natively send data from left to right and vice versa. So in the negative values, you have exactly the same concept as above, but the data is just put back in the right direction.
Smooth Level
- What’s Smooth Level? A signal softener
- Options: 0 to 10
To make the force feedback signal softer and smoother, you can increase this setting. However, the higher the level, the more fine detail you’ll lose. Use with moderation!
Wheel Return Speed
- What’s Wheel Return Speed? The speed at which the wheel can turn
- Options: 1 to 100
This is the speed at which the wheel will be able to move, react and turn in response to your actions or those sent by the force feedback. The higher the setting, the livelier the wheel will be, but it can also take away from the natural feel. Setting it very low will reduce reaction speed, but will also cause a loss of detail, for example in the event of a loss of grip. Once again, you’ll have to find the balance you like!
Suspension
- What’s suspension? Soften or harden suspension effects
- Options: 0 to 9
You can harden the suspension effect by increasing this setting. The force feedback then seems more impactful, more incisive in a way. This can be interesting if you feel you need to “magnify” FFB details. On the other hand, it can add unwanted noise from the base. Once again, it’s all a question of taste and balance.
Backups
- What are backups? Saving or loading force feedback settings
Your Simagic base comes with a number of saved settings that you can use as a basis for your work. But what we’re really interested in is saving different force feedback configurations. That’s where it all happens, and you’ll be able to retrieve your saved settings in a matter of seconds.
The right-hand side of Simagic SimPro
Compatibility Mode – Normal Mode
- What’s this? Choosing between Native Mode and Compatibility Mode
If you’re playing with a simulation that doesn’t recognize Simagic bases, you can switch to Compatibility Mode. In this case, the steering wheel will be recognized as a joystick-type peripheral. Please note, however, that every time you restart the base, it automatically returns to Normal mode. Don’t forget to switch back to compatible mode if necessary 😉
Mechanical Spring
- What’s a mechanical spring? The wheel’s recentering force
- Options: 0 to 100
If you want your steering wheel to come back to center on its own under all circumstances, you can use this setting. But be aware that almost all games have their own spring effect, which is used in the game menus. You should therefore leave this setting at 0 unless you’re playing a game with no integrated force feedback at all.
Mechanical Damper
- What’s Mechanical Damper? Force feedback damping
- Options: 0 to 100
On a Direct Drive base, the steering shaft is not connected to any mechanical element (well, almost not) that would brake it. To add the impression of having a real steering shaft connected to wheels that rub on the asphalt, the damper can be a solution.
Damper is a damping effect which also tends to make the steering wheel heavier. Road and suspension effects will seem more natural, to the detriment of fine detail. So it’s a question of finding your own balance to get both the right immersion and all the information you need to perform.
This is also a very useful setting if you have problems with wobble. If ever your steering wheel tends to go off in all directions in a straight line, turn up the damper a little to reduce or eliminate the problem.
Mechanical Friction
- What’s Mechanical Friction? Adds friction to the steering shaft
- Options: 0 to 100
Friction is an effect that adds weight to the steering shaft. The higher you set this parameter, the easier it is to turn the wheel. It’s also a handy setting to counter oscillations!
Mechanical Inertia
- What’s Mechanical Inertia? Steering wheel inertia
- Options: 0 to 100
This effect adds inertial force to steering wheel movements. Handy if you want the sensation of the vehicle’s weight shifting to one side or the other. However, the more you increase inertia, the more you lose road details. It’s a useful setting for drifting, when you want the wheel to move one way and then the other with greater ease.
Interpolation Level
- What’s Interpolation Level? Filling the gaps in the communication between the set and the wheel
- Options: 0 to 9
Game force feedbacks are not equal in the amount of information they send to the wheels. Every second, the game must send data so that the base knows what to do. The problem is that between the data sent, there are gaps.
And if on belt or gear bases, the holes are erased by the mechanical parts behind the steering shaft… With Direct Drive bases, this can cause a“grainy” sensation in the force feedback.
Interpolation is used to fill the gaps between data. The game sends “chopped” data, and the software will fill in the gaps to make everything as smooth and understandable as possible. Try out different interpolation settings depending on the simus you’re using!
Advanced settings window
As always in settings software, you have the opportunity to filter the game’s filters. To access it, click on the red Advanced Settings box, which will open a window. Don’t worry, these are the last settings – we’re just about there!

Game Inertia, Spring, Damper, Friction
- What’s Game Inertia? Juggle the effect filters used by the game
- Options: 0 to 200
We’ve talked about these effects before, so I’ll spare you the explanation. This time, the interest is in taking more or less into account the effects sent by the game itself. The default setting is 100. You can lower them to 0 to cut the effect. Or raise them to 200 to double the strength of the chosen effect.
You’re now a Simagic SimPro master!
That’s it! As you can see, it doesn’t take long to get the hang of it 🙂
Take half an hour on your favorite simulation to test each setting one by one. Only then will you be able to fully understand the wide-ranging possibilities offered by Simagic SimPro and the excellent Simagic basics.
Don’t hesitate to let me know in the comments if this was helpful or if there are certain terms that need to be explained differently. I have to admit that I’ve sometimes struggled to find the words to explain the abstract concepts found in FFBs ^^
See you in the comments 😉